
C++
Documentation for IB Computing Exercises (2016-17)
- Editor and Development Environment
- Compiling and Running
- "for" loops
- Ex 1: Estimating pi by series summation (3 marks)
- Functions
- Ex 2: Finding roots using the Bisection method (3 marks)
- Ex 3: Matrices and Graphics (3 marks)
- The vector class
- Using class
- Longer Exercises
- Further Reading
This course consists of 3 exercises on this page (which are mostly revision) followed by some longer problems. You should read the handout before your first session. You can begin the work before the start of the lab
session if you wish. The lab sessions are compulsory and there are penalties for lateness. To receive the qualification mark (12 marks) you need to complete at least 4 exercises. You should complete - and get
marked - at least one problem in each lab session. A maximum of 16 marks are available. Students who have programmed before are advised to try the 4 longer exercises.
Exercise Mark 1 3 2 3 3 3 4 3 5 4 6 4 7 5
The CUED Tutorial Guide to C++ Programming has more details about the language, and the 1AC++Examples folder (in your home folder) contains over 10 examples that we gave you last year that illustrate various aspects of the C++ language.
Start sessions in the DPO by clicking on the  icon at the top of the screen and then the "CUED 2nd Year" option to run the Start IBComputing option. This will give you some files and icons that you need for the lab.
If you want to see all the extra step-by-step instructions, click on this see-extras button
Editor and Development Environment [ back to contents]
C++ source files are plain text, so you may use any text editor you wish (or use the  program you used in the first year), but these instructions assume you'll use Emacs, a standard editor.
You'll compile your programs at the command line.
program you used in the first year), but these instructions assume you'll use Emacs, a standard editor.
You'll compile your programs at the command line.
Clicking on the Start 1BComputing icon created a 1BC++ folder for you - a place to keep your source files for this course.
To start editing a file called foo.cc, first open a terminal window (command line interface) if you don't already have one. Use the little  icon in the Favorites section of the Applications menu to start a new window. Then run Emacs, passing the file name as a command line parameter:
emacs foo.cc &
The '&' tells the terminal to run Emacs in the background (so that you can still type in the terminal). You can use the menu bar and tool bar to manipulate files, or you can use keystrokes. Ctrl-x Ctrl-s saves the current file (called a 'buffer'), and Ctrl-x Ctrl-f allows you to open another file (or create a new file) by typing the name. Ctrl-x Ctrl-c quits Emacs. Tab correctly indents the current line. For more details, see the CUED new user guide.
Compiling and Running [ back to contents]
After editing your program, you need to save the file and compile it before running it. Running
g++ -Wall -o foo foo.cc
will compile foo.cc into executable foo, and print any errors or warnings (with line numbers). Once you have successfully compiled, you can then run the program:
./foo
You need the initial "./" - just typing the program name won't work. Also note that clicking on the foo icon won't work either in this situation. It will run the program but it won't create a window for it first, so you won't see any text output or have the chance to input anything.
To avoid typing the compiler options every time, you can create a file called Makefile in the current directory containing a single line of text. This will create the file:
echo "CXXFLAGS= -Wall" > Makefile
Then you can compile any source file something.cc to executable something using the make system, which will invoke g++ automatically:
make something
Syntax of for loops [ back to contents]
The for loop is an extremely flexible but occasionally confusing control structure:
   for  (initialiser ;  condition ; post)
      body
It has four parts:
- initializer: a statement that is executed exactly once before the loop begins
- condition: an expression evaluated before each iteration of the loop; when condition is false, the loop ceases
- body: a statement (terminated with ';') or block of statements (inside curly braces `{' ... `}') executed at each iteration
- post: a statement executed after each iteration of body, before condition is reevaluated
Thus the above for loop is shorthand for this while loop:
   initialiser;
   while (condition)
   {
     body
     post;
   }
Example for loops [ back to contents]
Often you want an integer index to loop through consecutive range of values (for instance, for iterating through the elements of an array). When you do this using a for loop you need to ask yourself
- What are the bounds of the interval? For instance, when looping through an array with n elements, the interval covered by the index is [0,n), which is the same as [0,n-1].
- Should the index go from low to high (forwards) or from high to low (backwards)?
The intialiser, condition, and post statement are determined by the answers to these questions. Here are some examples
A forward loop with index i covering the half-open interval [0,n):
   for  (int i = 0; i < n;  ++i) {
      ...
   }
A backward loop with index i covering the half-open interval [0,n):
   for(int i = n-1; i >= 0; --i)
   {
      ...
   }
A forward loop with index i covering numbers less than sqrt(n) :
   for (int i = 0; i*i < n;  ++i)
   {
      ...
   }
A forward loop with index i covering even numbers up to and including n:
   for(int i = 0; i <= n;  i += 2)
   {
      ...
   }
A forward loop with index i over all elements of an array of size 10 called v:
   for(unsigned int i = 0; i < 10;  ++i)
   {
      // current element is v[i]
   }
Somehow or other you need to become fluent with for loops. Test yourself now
For-loop quiz
When you've done that successfully you're ready to try this exercise
Estimating pi by series summation ("for" loop) [ back to contents]
This way of calculating pi is far more efficient than the pen-dropping method you used in year 1.
- Write a program to print out the first N (1 <= N <= 100) terms in the series 1/i2. The number of terms, N, is to be input by the user at the keyboard.
- Modify your program so that for each value of the index i, it evaluates the sum of the first i terms.
- The sum of this series can be shown (Leonhard Euler (1707-1783)) to converge to pi2/6. Make another modification to your program so that at each iteration the estimate of pi is printed instead of the sum. How good is the estimate of pi after N=100 iterations? How many iterations are needed to get an estimate of pi which is accurate to 2 decimal places after rounding?
Functions [ back to contents]
You created some functions in the 1st year. If you're still unsure about the basics read
- the Frequently Ask Question about functions
- More about Function (from the 1A notes)
- Functions - from the Tutorial Guide
Passing by reference
If you want a C++ function to modify a variable that it's given, pass the variable by reference (add '&' to the argument type). The following code shows 2 functions that differ according to whether the parameter is passed by reference. Make sure you understand the implications of this.
   void value_func(int param) { param += 2; }
   void ref_func(int& param) { param += 2; }
   int main() {
      int x = 2;
      value_func(x); // x is still 2
      ref_func(x);   // x is now 4
   }
See the FAQ entry for more details.
Overloading
In C++ it's possible to have 2 functions with the same name as long as they take different parameters. This is called overloading. For example, you can have functions with these prototypes
  void process(int x);
  void process(int x, int y);
and there won't be any ambiguity if in your code you call them using
  process(3);
  process(3, 5);
- the appropriate version of the function will always be called.
Somehow or other you need to become fluent with using functions!. Test yourself now
Function quiz
Finding roots using the Bisection method (writing functions) [ back to contents]
 The problem of finding the square root of a number, c, is a special case
of finding the root of a non-linear equation of the form f(x)=0 where
f(x) = c - x2. We would like to find values of x such that f(x) = 0.
The problem of finding the square root of a number, c, is a special case
of finding the root of a non-linear equation of the form f(x)=0 where
f(x) = c - x2. We would like to find values of x such that f(x) = 0.
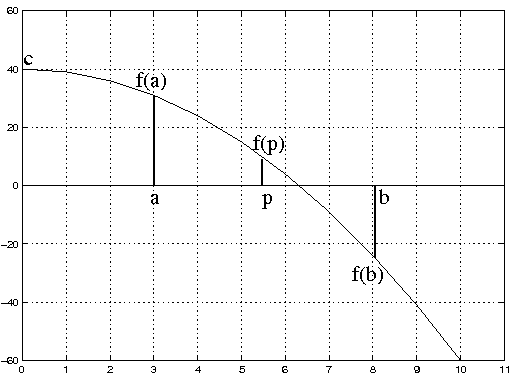
A simple method consists of trying to find 2 values of x where the function's value has different signs. We would then know that one solution lies somewhere between these values. For example: If f(a) * f(b) < 0 and a < b then the solution x must lie between these values: i.e. a < x < b. We could then try to narrow the range and hopefully converge on the true value of the root. This is the basis of the so-called Bisection method.
The Bisection method is an iterative scheme (i.e. repetition of a simple
pattern) in which the interval is
halved after each iteration to give the approximate location of the
root. After i iterations the root
(let's call it xi, i.e. x after i iterations) must lie between ai and bi and an approximation for the root is given by pi = (ai + bi)/2. The error ei between the approximation and the true root is
bounded by ei = (bi - ai)/2 = (b1 - a1)/2i.
At each iteration the sign of the functions f(ai) and f(pi)
are tested and if f(ai) * f(pi) < 0 the root must
lie in the half-range ai < x < pi. Alternatively the root lies in
the other half (see figure).
We can thus update the new lower and upper bound for the root using this logic
if f(ai) * f(pi) < 0
then ai+1 = ai and bi+1 = pi
else ai+1 = pi and bi+1 = bi
Unless you understand this theory you won't be able to write the problem, so re-read the explanation if necessary, or read Wikipedia's Bisection page. Then
- Write a function that computes the square root of a number in the range 1 < x <= 100 with an accuracy of 10-4 using the Bisection method. The Math library sqrt function must not be used.
- Test your function by calling it from a program that prompts the user for a single number and displays the result.
- Modify this program so that it computes the square roots of numbers from 1 to 10. Compare your results with the answers given by the sqrt() mathematical library function.
Matrices and Graphics [ back to contents]
You're now going to transform shapes using matrix multiplication. Graphics aren't part of C++, so that part of the code will be done for you (you'll use OpenGL as you did in the 1st year and with the Mars Lander). Matrices will be implemented as 2D arrays, which you met in the first year too.
 First, a little theory. If the coordinates (x,y) of a 2D point are in a column vector v, then the coordinates of the point when rotated theta anti-clockwise about the origin can be calculated using matrix multiplication as follows
        [ cos(theta) -sin(theta) ]
 newv = [ sin(theta) cos(theta)  ] * v
To scale the values by xscale in the x direction and yscale in the y direction, you can do
        [ xscale    0     ]
 newv = [   0     yscale  ] * v
If v is a matrix with 2 rows and n columns, then each column can represent a point and the 2-by-n resulting matrix will contain all the transformed coordinates. The calculations (but not the graphics) are shown in the Advanced Topics section of our "Tutorial Guide to C++ Programming".
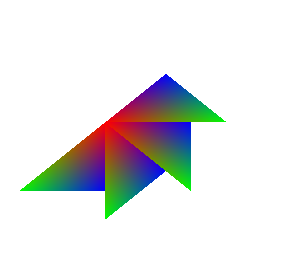
The following code displays a colourful triangle on the screen. Your task is to transform this triangle. Start by rotating it 4 times by 45 degrees clockwise to get the output shown on the right. You need to create a ComputeMatrix function to calculate the transform matrix, and a RotateCoordinates function to perform the rotation.
// Call this file graphics.cc. Compile using
// g++ -I/usr/local/include -I/usr/include/GL -L/usr/local/lib -o graphics graphics.cc  -lglue -lglut -lGLU -lGL
// Run it by typing
//   ./graphics

#include <iostream>
#include <cmath>
#include <unistd.h> // for sleep
#include "glue.h"
using namespace std;

// Call the transform routines and draw the graphics.
void mygraphics(int w, int h) {
  float triangleCoords[2][3]={{0,   0.33, 0 },
                              {0.33,0.33, 0 }};
  float matrix [2][2];
  float angle=-M_PI/4; // in radians
  // Set coordinate system to be -1>x>1; -1>y>1 with (-1,-1) bottom left
  glViewport(0, 0, w, h);
  glMatrixMode(GL_PROJECTION);
  glLoadIdentity();

  // Uncomment the next line of code that calls ComputeMatrix
  // to set the elements in the matrix appropriately.
  // ComputeMatrix(matrix,angle);

  // Rotate by "angle" radians 4 times
   for (int i=0;i<4;i++) {
     // Uncomment the next line of code that calls RotateCoordinates
     // to rotate the coordinates in the triangleCoords array
     // RotateCoordinates(matrix, triangleCoords);

     // Draw a triangle, with blue, green and red vertices
    glBegin(GL_TRIANGLES);
    glColor3f(0.0, 0.0, 1.0);  // blue
    glVertex2f(triangleCoords[0][0], triangleCoords[1][0]);
    glColor3f(0.0, 1.0, 0.0);  // green
    glVertex2f(triangleCoords[0][1], triangleCoords[1][1]);
    glColor3f(1.0, 0.0, 0.0);  // red
    glVertex2f(triangleCoords[0][2], triangleCoords[1][2]);
    glEnd();
    glFlush();
    sleep(1); // pause for 1 second.
    }
}

int main() {
  glueWindow();
  graphicsfunction (mygraphics);
  glueGo();
}
- Copy and compile the provided code. Exit using
Ctrl-C - Look at how ComputeMatrix and RotateCoordinates are going to be called, and write the protoypes for these functions (note that arrays are always passed by reference)
- Write the ComputeMatrix function to initialise the elements of the transform matrix (you might want to print the values out to see if they're correct). Compile the code.
- Write the RotateCoordinates code to change the coordinates of the triangle's vertices. Remember not to overwrite the values in triangleCoords until they original values are no longer needed.
- Uncomment the calls to ComputeMatrix and RotateCoordinates (you might want to print the transformed coordinates out to see if they're correct). Compile and run the code.
You could change the angle, the number of repetitions, or try shrinking the triangle as you spin it. Look on the Web to see how to perform other transformations using matrices, and how to combine transformations.
That ends the revision stage. The rest of the material on this page is needed for the later exercises.
The vector class [ back to contents]
When C++ was developed from C the designers realised that arrays were a weakness and introduced vectors. In the exercises to come you will need to store variables in containers with sizes that change at run time. The vector template class, part of the C++ Standard Library, is just this sort of collection. To declare a vector with elements of type double:
vector<double> v;
The type of element that the vector holds is written between the triangle brackets. The vector declared above, holding elements of type double, is initially empty. You can...
- get the number of elements in the vector with the size() member function:
cout << v.size() << endl;
- append an element onto the back of the vector using the push_back(...) member function:
   v.push_back(3.14); // increases v.size() by 1
   v.push_back(2.71); // increases v.size() by 1
- access the elements of the vector using '[]' (the index of first element is 0):
   cout << v[0] << endl;
   v[1] = 1.68;
- declare a vector with a known size:
vector<int> some_ints(10); // 10 int elements, uninitialized
- specify a default value in the declaration:
vector<double> some_reals(10, 0.0); // 10 real numbers, all zero
- loop through the vector forwards...
for (unsigned int i=0; i<v.size(); ++i) { cout << v[i] << " "; } - ...or backwards:
for (int i=v.size()-1; i>=0; --i) { cout << v[i] << " "; } - C++ has dozens of functions that can be used with vectors to sum, sort, shuffle and search the elements. Here's a simple example
#include <vector>    // needed for vector
#include <algorithm> // needed for reverse
using namespace std;

int main() {
vector<int> v(3); // Declare a vector of 3 ints
  v[0] = 7;
  v[1] = v[0] + 3;
  v[2] = v[0] + v[1];
  reverse(v.begin(), v.end());
}
Note that this uses the begin() and end() member functions of vector to describe how much of the vector to reverse (in this case all of it)
Using class [ back to contents]
In C++, you can group multiple variables together into a named type by defining a class:
   class Person {
   public:
     string name;
     int age;
     double height, weight;
   };
You can access the fields, called members, using the '.' operator, and you can assign variables of the same class type to each other:
   Person a, b;        // declare two variables of type Person
   a.name = "Foo Bar";
   a.weight = 70.0;
   a.height = 1.5;
   a.age = 21;
   b = a;              // all members of a are assigned from b
   cout << b.name <<  " is " <<  b.age <<  " years old, "
      <<  b.height <<  "m tall, and weighs " <<  a.weight <<  "kg" <<  endl;
You can pass variables like this to functions, and use them as return values. You can also declare a vector with class elements. The following code creates a vector of 7 Persons and then sets the age of the 4th person to 47.
   vector<Person> people(7);
   people[3].age = 47;
Longer Exercises [ back to contents]
- Exercise 4 (3 marks)
- Exercise 5 (4 marks)
- Exercise 6 (4 marks)
- Exercise 7 (5 marks)
Further Reading [ back to contents]
- 1A C++ coursework, Michaelmas
- CUED's C++ page
- CUED's C++ Frequently Asked Questions
- 1B CUED C++ crib
- Unix from the command line
- © 2010 University of Cambridge Department of Engineering
Information provided by Roberto Cipolla and Ethan Eade (Last updated: December 2010) - Privacy
- Accessibility