
wxWidgets with Python
wxWidgets is a way to write Graphical User Interfaces (GUIs, with buttons, menus, etc) for Win32, Mac OS X, etc from C++, Python, Perl, and C#/.NET. It's used in our IIA Software Engineering Project. Though it's cross-platform, the resulting programs don't look the same on all machines - they follow the look-and-feel of the machine. Whereas other graphics libraries we use at CUED (OpenGL and GLUT) aren't Object-Oriented, wxWidgets is, so you need some awareness of using classes.
Versions
This document briefly introduces wxWidgets 3.0 when used with Python 3, highlighting a
few issues
that sometimes puzzle newcomers. Knowing which version you're using matters, especially when you reports bugs.
- On Linux, type "
uname -a" to find out the operating system version, or looking in Settings. - Type
pythonto find the Python version, then typeimport wx wx.version()
to find the wxWidgets version.
These examples were developed on "18.04.1-Ubuntu" using "Python 3.7.6" and "4.0.4 gtk2 (phoenix) wxWidgets 3.0.5". On different systems your programs will look different.
Concepts
The basic concepts are much the same as in most graphics systems.
- Widgets (things - windows, buttons, etc). These have properties like
color, size, etc. Some widgets (e.g. frames) can have other widgets inside
them.
wxGLCanvasis a useful widget that allows you to use OpenGL commands in a window. This lets you use advanced graphics. For simpler drawing you can use the wxDC class. - Events (triggering actions - keypresses, window resizing, mouse clicks, etc). When an event happens, your program might want to react to it. You can arrange for particular events in certain widgets to cause a routine to run. These routines are refered to as "callbacks" or "handlers".
- Sizers - these are layout managers: they organise widgets when they're within other widgets. If for example you want a row of buttons in a panel, you don't have to calculate sizes and coordinates when the main window is resized. If you specify for each button a minimal size, a stretch factor, a border, and what's to the left of it, the sizer routine will manage the re-drawing.
Programs with GUIs often have quite a different organisation to non-GUI programs. What you do is create the widgets and set things up so that the appropriate callbacks are called. Then you call the main event-loop, giving control over to the application. From then on, the program waits for events. When they happen, the program calls the appropriate callback then waits for the next event. Exiting the loop exits from the program.
Writing a program
Here are the main steps. Full code is in the next section
- Create a
wx.Appobject. This is the top level of your program. - Create an object derived from the frame class - this will be the parent of widgets
- Create widgets, and put them in sizers. Put the sizers in frames or sizers
- Write the handlers to deal with events
- Launch the app
Identifiers
Each component needs to be given a unique integer identifier if it is to used later. You can provide explicit values. There are some Standard Event Identifiers - using wxID_ANY lets wxWidgets assign an unused identifier to the component automatically. There's also wxID_EXIT, etc.
Demo 1
# Adapted from an example by Dr Gee (CUED)
import wx

class Gui(wx.Frame):

    def __init__(self, title):
        """Initialise widgets and layout."""
        super().__init__(parent=None, title=title, size=(400, 400))

        # Configure the file menu
        fileMenu = wx.Menu()
        menuBar = wx.MenuBar()
        fileMenu.Append(wx.ID_EXIT, "&Exit")
        menuBar.Append(fileMenu, "&File")
        self.SetMenuBar(menuBar)

        # Configure the widgets
        self.text = wx.StaticText(self, wx.ID_ANY, "Some text")
        self.button1 = wx.Button(self, wx.ID_ANY, "Button1")
        # Bind events to widgets
        self.Bind(wx.EVT_MENU, self.OnMenu)
        self.button1.Bind(wx.EVT_BUTTON, self.OnButton1)
        # Configure sizers for layout
        main_sizer = wx.BoxSizer(wx.HORIZONTAL)
        side_sizer = wx.BoxSizer(wx.VERTICAL)
        main_sizer.Add(side_sizer, 1, wx.ALL, 5)

        side_sizer.Add(self.text, 1, wx.TOP, 10)
        side_sizer.Add(self.button1, 1, wx.ALL, 5)

        self.SetSizeHints(300, 300)
        self.SetSizer(main_sizer)

    def OnMenu(self, event):
        """Handle the event when the user selects a menu item."""
        Id = event.GetId()
        if Id == wx.ID_EXIT:
            self.Close(True)

    def OnButton1(self, event):
        """Handle the event when the user clicks button1."""
        print ("Button 1 pressed")

app = wx.App()
gui = Gui("Demo")
gui.Show(True)
app.MainLoop()
The following part of the constructor for Gui may need an explanation.
super().__init__(parent=None, title=title, size=(400, 400))
When a derived object is created, it will by default first call the
default constructor of the class it's derived from (the superclass). In this case however,
we don't want to call wx.Frame's default constructor, we want to pass
some arguments. It's a constructor "with a member initialiser list"
Troubleshooting
In general, if your program's Python is legal, but doesn't work properly
- Start from an example that works.
- Check to see if you're using a faultly implementation - the code's supposed to work the same on all platforms, but that's not always so in practise.
- If widgets don't appear, or are in the wrong place when you resize the window, check that the widgets are being managed by the appropriate sizers, and the sizers are in turn associated with a parent sizer or frame. Nothing should be unmanaged. Drawing a diagram may help. In the example above
side_sizerstacks its contents (text and a button) vertically.main_sizerarranges its contents (side_sizer) horizontally, and is associated withGui
Segmentation fault (core dumped) message the system may not give you much of a clue about your mistake. The message means that you've managed to make some C++ code crash (which isn't hard to do when usingwxWidgets). Check carefully the arguments used in the call that seems to be the cause.Toolbars
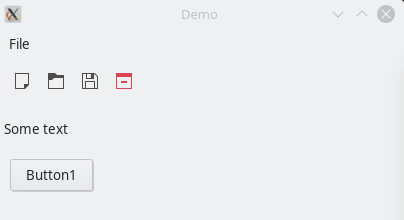 This extension of the first program adds a toolbar whose final "Exit" icon has a callback, and whose second "open file" icon creates a
 wxFileDialog to get a "*txt" filename from the user. The icons for the toolbox are supplied with wxWidgets (or maybe the operating system)
# Adapted from an example by Dr Gee (CUED)
import wx
from wx import ArtProvider

class Gui(wx.Frame):
    QuitID=999
    OpenID=998
    def __init__(self, title):
        """Initialise widgets and layout."""
        super().__init__(parent=None, title=title, size=(400, 400))
        QuitID=999
        OpenID=998
        locale = wx.Locale(wx.LANGUAGE_ENGLISH)
        # Configure the file menu
        fileMenu = wx.Menu()
        menuBar = wx.MenuBar()
        fileMenu.Append(wx.ID_EXIT, "&Exit")
        menuBar.Append(fileMenu, "&File")
        self.SetMenuBar(menuBar)
        toolbar=self.CreateToolBar()
        myimage=wx.ArtProvider.GetBitmap(wx.ART_NEW, wx.ART_TOOLBAR)
        toolbar.AddTool(wx.ID_ANY,"New file", myimage)
        myimage=wx.ArtProvider.GetBitmap(wx.ART_FILE_OPEN, wx.ART_TOOLBAR)
        toolbar.AddTool(OpenID,"Open file", myimage)
        myimage=wx.ArtProvider.GetBitmap(wx.ART_FILE_SAVE, wx.ART_TOOLBAR)
        toolbar.AddTool(wx.ID_ANY,"Save file", myimage)
        myimage=wx.ArtProvider.GetBitmap(wx.ART_QUIT, wx.ART_TOOLBAR)
        toolbar.AddTool(QuitID,"Quit", myimage)
        toolbar.Bind(wx.EVT_TOOL, self.Toolbarhandler)
        toolbar.Realize()
        self.ToolBar = toolbar
        # Configure the widgets
        self.text = wx.StaticText(self, wx.ID_ANY, "Some text")
        self.button1 = wx.Button(self, wx.ID_ANY, "Button1")
        # Bind events to widgets
        self.Bind(wx.EVT_MENU, self.OnMenu)
        self.button1.Bind(wx.EVT_BUTTON, self.OnButton1)
        # Configure sizers for layout
        main_sizer = wx.BoxSizer(wx.HORIZONTAL)
        side_sizer = wx.BoxSizer(wx.VERTICAL)
        main_sizer.Add(side_sizer, 1, wx.ALL, 5)

        side_sizer.Add(self.text, 1, wx.TOP, 10)
        side_sizer.Add(self.button1, 1, wx.ALL, 5)

        self.SetSizeHints(300, 300)
        self.SetSizer(main_sizer)

    def OnMenu(self, event):
        """Handle the event when the user selects a menu item."""
        Id = event.GetId()
        if Id == wx.ID_EXIT:
            print("Quitting")
            self.Close(True)

    def OnButton1(self, event):
        """Handle the event when the user clicks button1."""
        print ("Button 1 pressed")

    def Toolbarhandler(self, event):
        if event.GetId()==self.QuitID:
            print("Quitting")
            self.Close(True)
        if event.GetId()==self.OpenID:
            openFileDialog= wx.FileDialog(self, "Open txt file", "", "", wildcard="TXT files (*.txt)|*.txt", style=wx.FD_OPEN+wx.FD_FILE_MUST_EXIST)
            if openFileDialog.ShowModal() == wx.ID_CANCEL:
               print("The user cancelled")
               return     # the user changed idea...
            print("File chosen=",openFileDialog.GetPath())

app = wx.App()
gui = Gui("Demo")
gui.Show(True)
app.MainLoop()
Finding windows
After creating a window or a button, you may need to access it again from a different function from where it was created. To do this you'll need to store the value returned when the window was created and make that value visible from elsewhere. Alternately you can use wXwidget's FindWindowById, FindWindowByLabel, or FindWindowByName function to find the window when you need it. The next program shows how to do this.
Scrollbars
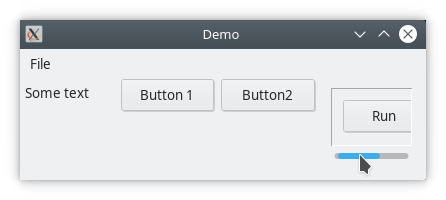 A varient of the
 wxWindow called wx.ScrolledWindow can be used if you want scrollbars with automatic callbacks. Compared with the previous program the program below has an extra window with a Run button. This extra window has scrollbars that will only appear when the displayed window dimensions are less than the actual window size (in the illustrated situation the displayed width but not the height is too small). This code also shows FindWindowByName in use.
# Adapted from an example by Dr Gee (CUED)
import wx

class Gui(wx.Frame):
    def __init__(self, title):
        """Initialise widgets and layout."""
        super().__init__(parent=None, title=title, size=(400, 100))

        # Configure the file menu
        fileMenu = wx.Menu()
        menuBar = wx.MenuBar()
        fileMenu.Append(wx.ID_EXIT, "&Exit")
        menuBar.Append(fileMenu, "&File")
        self.SetMenuBar(menuBar)
        button_sizer = wx.BoxSizer(wx.HORIZONTAL)
        # Configure the widgets
        self.text = wx.StaticText(self, wx.ID_ANY, "Some text")
        button_sizer.Add(self.text, 1, wx.TOP+wx.LEFT+wx.RIGHT, 5)
        self.button1 = wx.Button(self, wx.ID_ANY, label="Button 1", name="SomeNameOrOther")

        button_sizer.Add(self.button1, 1, wx.RIGHT, 5)
        self.button2 = wx.Button(self, wx.ID_ANY, "Button2")

        button_sizer.Add(self.button2 , 1, wx.RIGHT, 5)
        # Bind events to widgets
        self.Bind(wx.EVT_MENU, self.OnMenu)
        self.button1.Bind(wx.EVT_BUTTON, self.OnButton1)
        self.button2.Bind(wx.EVT_BUTTON, self.OnButton2)
        # Configure sizers for layout
        main_sizer = wx.BoxSizer(wx.HORIZONTAL)
        side_sizer = wx.BoxSizer(wx.VERTICAL)
        main_sizer.Add(side_sizer, 1, wx.ALL, 5)

        side_sizer.Add(self.text, 1, wx.TOP, 10)
        side_sizer.Add(self.button1, 1, wx.ALL, 5)
        side_sizer.Add(self.button2, 1, wx.ALL, 5)

        self.SetSizeHints(300, 100)
        self.SetSizer(button_sizer)
        controlwin = wx.ScrolledWindow(self, -1, wx.DefaultPosition, wx.DefaultSize, wx.SUNKEN_BORDER|wx.HSCROLL|wx.VSCROLL)
        button_sizer.Add(controlwin,1,
                wx.EXPAND | wx.ALL, 10)
        button_sizer2 = wx.BoxSizer(wx.VERTICAL)
        controlwin.SetSizer(button_sizer2)
        controlwin.SetScrollRate(10, 10)
        controlwin.SetAutoLayout(True)

        button_sizer2.Add(wx.Button(controlwin, wx.ID_ANY, "Run"), 0, wx.ALL, 10)

    def OnMenu(self, event):
        """Handle the event when the user selects a menu item."""
        Id = event.GetId()
        if Id == wx.ID_EXIT:
            print("Quitting")
            self.Close(True)

    def OnButton1(self, event):
        """Handle the event when the user clicks button1."""
        print ("Button 1 pressed")

    def OnButton2(self, event):
        """Now find button 1 and change its label."""
        print ("Button 2 pressed")
        tmp=wx.FindWindowByName("SomeNameOrOther")
        if tmp!=None:
            tmp.SetLabel("Button 1 updated")


app = wx.App()
gui = Gui("Demo")
gui.Show(True)
app.MainLoop()
And here's a scrollable canvas
// Call this scrolledcanvas.cc and compile using
// g++ -o scrolledcanvas scrolledcanvas.cc  `wx-config --cxxflags` `wx-config  --libs --gl_libs` -lglut -lGL -lGLU

#include "wx/wx.h"
#include <wx/glcanvas.h>
#include <iostream>
#include <GL/glut.h>

class MyGLCanvas: public wxGLCanvas
{
 public:
  MyGLCanvas(wxWindow *parent, wxWindowID id = wxID_ANY, const wxPoint& pos = wxDefaultPosition, const wxSize& size = wxDefaultSize);
  void Render(wxString example_text = ""); // function to draw canvas contents
 private:
  wxGLContext *context;              // OpenGL rendering context
  bool init;                         // has the OpenGL context been initialised?
  int pan_x;                         // the current x pan
  int pan_y;                         // the current y pan
  double zoom;                       // the current zoom
  void InitGL();                     // function to initialise OpenGL context
  void OnSize(wxSizeEvent& event);   // event handler for when canvas is resized
  void OnPaint(wxPaintEvent& event); // event handler for when canvas is exposed
  DECLARE_EVENT_TABLE()
};

void MyGLCanvas::Render(wxString example_text) {
SetCurrent(*context);
  if (!init) {
    InitGL();
    init = true;
  }
  glClear(GL_COLOR_BUFFER_BIT);
  int y;
  glColor3f(0.0, 1.0, 0.0);
  glBegin(GL_LINE_STRIP);
    for (int i=0; i<5; i++) {
      if (i%2) y = 10.0;
      else y = 30.0;
      glVertex2f(20*i+10.0, y);
      glVertex2f(20*i+30.0, y);
    }
  glEnd();
  glColor3f(0.0, 0.0, 1.0);
  glRasterPos2f(10, 100);
  for (int i = 0; i < example_text.Len(); i++) glutBitmapCharacter(GLUT_BITMAP_HELVETICA_12, example_text[i]);

  // We've been drawing to the back buffer, flush the graphics pipeline and swap the back buffer to the front
  glFlush();
  SwapBuffers();
}

void MyGLCanvas::InitGL()
  // Function to initialise the GL context
{
  int w, h;
  GetClientSize(&w, &h);
  SetCurrent(*context);
  glDrawBuffer(GL_BACK);
  glClearColor(1.0, 1.0, 1.0, 0.0);
  glViewport(0, 0, (GLint) w, (GLint) h);
  glMatrixMode(GL_PROJECTION);
  glLoadIdentity();
  glOrtho(0, w, 0, h, -1, 1);
  glMatrixMode(GL_MODELVIEW);
  glLoadIdentity();
  glTranslated(pan_x, pan_y, 0.0);
  glScaled(zoom, zoom, zoom);
}

void MyGLCanvas::OnPaint(wxPaintEvent& event)
  // Event handler for when the canvas is exposed
{
  int w, h;
  wxString text;

  wxPaintDC dc(this); // required for correct refreshing under MS windows
  GetClientSize(&w, &h);
  text.Printf("Canvas redrawn by OnPaint event handler, canvas size is %d by %d"
, w, h);
  Render(text);
}

void MyGLCanvas::OnSize(wxSizeEvent& event)
  // Event handler for when the canvas is resized
{
  init = false; // this will force the viewport and projection matrices to be reconfigured on the next paint
}

BEGIN_EVENT_TABLE(MyGLCanvas, wxGLCanvas)
  EVT_SIZE(MyGLCanvas::OnSize)
  EVT_PAINT(MyGLCanvas::OnPaint)
END_EVENT_TABLE()

int wxglcanvas_attrib_list[5] = {WX_GL_RGBA, WX_GL_DOUBLEBUFFER, WX_GL_DEPTH_SIZE, 16, 0};

MyGLCanvas::MyGLCanvas(wxWindow *parent, wxWindowID id, const wxPoint& pos, const wxSize& size):
  wxGLCanvas(parent, id, wxglcanvas_attrib_list, pos, size)
  // Constructor - initialises private variables
{
  context = new wxGLContext(this);
  init = false;
  pan_x = 0;
  pan_y = 0;
  zoom = 1.0;
}

class ScrolledImageComponent : public wxScrolledWindow
{
     int w,h;
public:
    ScrolledImageComponent(wxWindow* parent, wxWindowID id) : wxScrolledWindow(parent, id)
    {
         /* init scrolled area size, scrolling speed, etc. */
        SetScrollbars(1,1, 400, 400, 0, 0);
    }
};


class MyApp: public wxApp
{
    wxFrame *frame;
public:

    bool OnInit()
    {
        char **tmp1; int tmp2 = 0; glutInit(&tmp2, tmp1);
        wxBoxSizer* sizer = new wxBoxSizer(wxHORIZONTAL);
        frame = new wxFrame((wxFrame *)NULL, -1,  wxT("Scrolling an Image"), wxPoint(50,50), wxSize(650,650));

        ScrolledImageComponent* my_image = new ScrolledImageComponent(frame, wxID_ANY );
        sizer->Add(my_image, 1, wxALL | wxEXPAND, 120);
        frame->SetSizer(sizer);
        MyGLCanvas* canvas= new MyGLCanvas(my_image, wxID_ANY, wxDefaultPosition,  wxSize(400,400));
        frame->Show();
        return true;
    }
};

IMPLEMENT_APP(MyApp)
Sources of wxWidgets information
You'll neeo find some on-line information. Make sure that the wxWidgets release you're using matches what the documentation describes (on Linux type "wx-config --release" to see what's installed). Here are some suggestions