
A LaTeX workshop exercise
Introduction
 LaTeX is a way of writing documents that is more like writing a program
than using Word. Initially it's harder than Word, but once you
start writing complicated technical reports with maths it becomes easier. This
session will show you how to use most of the features you'll need.
LaTeX is a way of writing documents that is more like writing a program
than using Word. Initially it's harder than Word, but once you
start writing complicated technical reports with maths it becomes easier. This
session will show you how to use most of the features you'll need.
There are various ways to produce LaTeX documents. The following
command-line method works on the Teaching System. You'll need to click Terminal icon in the
on the  menu at the top of the screen to get a command line. It will put you into your home folder. If you then type "mkdir latexworkshop ; cd latexworkshop" you'll have created a new folder to work in.
- Getting Started - copy the text below into a file called report.tex in
your new latexworkshop folder using your favourite editor.
   \documentclass{article}
   \usepackage{times} % Use the Times font

   \begin{document}
   Hello!
   \end{document}
It's a mixture of content (just the one word, "Hello!"), comments (anything following a % symbol) and LaTeX commands that begin with "\". Save the file, then typepdflatex report.texto process the file. Some information will be printed out, but as long as the output ends with something likeOutput written on report.pdf (1 page, 7445 bytes). Transcript written on report.log.
you're ok. Typeevince report.pdf &to see the result. From now on, you can edit the latex code, save it, run "pdflatex report.tex" again (use up-arrow on the keyboard to get previous commands back), and evince will show you the updated document.
If latex detects an error, you might see something like! Undefined control sequence. l.4 \bbegin {document} ?Type x to exit from LaTeX then try to fix the error (which in this case is on line 4). - Title and author - Rather than have to fuss with low-level detail like font-size, etc, you can let LaTeX do the formatting. Just after the
\begin{document} line, add
   \title{My First Report}
   \author{A. N. Other}
   \maketitle
and run pdflatex again (from now on, I'll refer to this as "processing"). - Abstract - Put this line in straight after the \maketitle line
   \abstract{This is a summary of the report. At the moment there's not
much to say}
Reprocess the document. - Sections and subsections - After the abstract, add the following
   \section{Introduction}
   Hello!  Here's some text.

   To make a new paragraph, just leave a blank line.

   \subsection{Background theory}
   More about this later

   \section{Apparatus}
   Test-tubes and so on.
and process the document. You'll see that the sections are numbered. - Table of contents - Add
\tableofcontents
just after the abstract and process the document. - Adding figures -
Put
\usepackage{graphicx}just after the \usepackage{times} line, to get access to the graphics commands. Then download peaks.pdf (putting it in the same folder as your report.tex file) and add this to the Apparatus section\begin{figure}[htbp] \includegraphics[width=10cm]{peaks.pdf} \caption{Matlab peaks} \label{PEAKS} \end{figure}and process the document. You should now have a 2-page document. The \label creates an invisible label for the figure, so that we can refer to it in the text (as you'll soon see). pdflatex also supports JPEG and PNG files. - Cross-referencing -
After "Here's some text." add
See figure \ref{PEAKS}.and run pdflatex twice. LaTeX will automatically add the correct figure number. - List of figures -
Put
\listoffigures
just after the \tableofcontents line and process. - Maths -
Add the following to the "Background theory" subsection.
  \begin{equation}
     \pi^2/6 = \sum_{x=1}^\infty \frac{1}{x^2} \label{PISQUARED}
  \end{equation}
Maths typesetting isn't trivial, but if you compare this code with the resulting output you'll see that the code's not too hard. Note again that we've added a label. After "blank line." addSee equation \ref{PISQUARED}.and run pdflatex twice. - Tables -
In the Introduction section add this
\begin{table}[htpb]
\begin{center}
\begin{tabular}{|l|l|r|}\hline
x & y & z \\ \hline
1 & 4 & 67.7 \\
-1 & 48 & 0 \\\hline
\end{tabular}
\end{center}
\caption{Coordinates}
\end{table}
and process the document. Tables aren't simple. Here, {|l|l|r|} (which uses lower case Ls, not digit 1s) says that you want 3 columns (left, left, and right aligned) with vertical lines at the edges and between columns. Columns are separated by & signs, lines are ended by \\ with an added \hline if a horizontal line is needed. - The rest -
After "and so on" add the following code, which shows you how to
produce some other effects.
    \textbf{bold text} and \textit{italic text} and a \% sign (a
    per-cent sign by itself makes the rest of the line a comment, like
    // in C++). You can put some maths inline like this - $\int sin(x)$
    - and verbatim text like this
    \begin{verbatim}
      int unlucky=13;
      while (unlucky--);
    \end{verbatim}
Process the file again.
After all that you should have a PDF file like this. If you need to know more, look at the following -
- The Not So Short Introduction to LaTeX2e is a 141 page introduction by Tobias Oetiker et al. It's probably all you need. There are versions in many languages.
- Advanced LaTeX and LaTeX Maths and Graphics documents are cook-books of features that students commonly use.
- Online Resources - start at our LaTeX page for anything else.
- To set margins to 3cm, put this just before the \begin{document} line
\usepackage{geometry} \geometry{margin=3cm} - To force the starting of a new page, use \newpage
Avoiding the command line
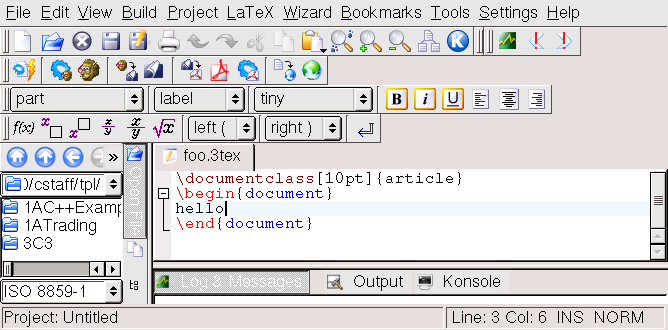 Several programs exist that make editing LaTeX files easier and have buttons
to do the processing. We have Kile on our local system (type kile in the Terminal window to start it). You still need to type LaTeX code, but Kile has many facilities (templates, wizards, etc) to make life easier.
Several programs exist that make editing LaTeX files easier and have buttons
to do the processing. We have Kile on our local system (type kile in the Terminal window to start it). You still need to type LaTeX code, but Kile has many facilities (templates, wizards, etc) to make life easier.
An alternative, cloud-based approach is Overleaf, which offers templates and collaboration facilities. You can register with your University email address - the University has a subscription.