
git exercise
If you're working on a file, you might be in the habit of saving versions every so often. If your file's called project you may create project2, project_old or projectJuly31 before making some changes, in case you change your mind. That's all well and good, but your folder gets cluttered, and if you have lots of files, or create alternative versions or if you're part of a team, that way of working becomes very messy.
 In this kind of situation,
 git is especially useful.
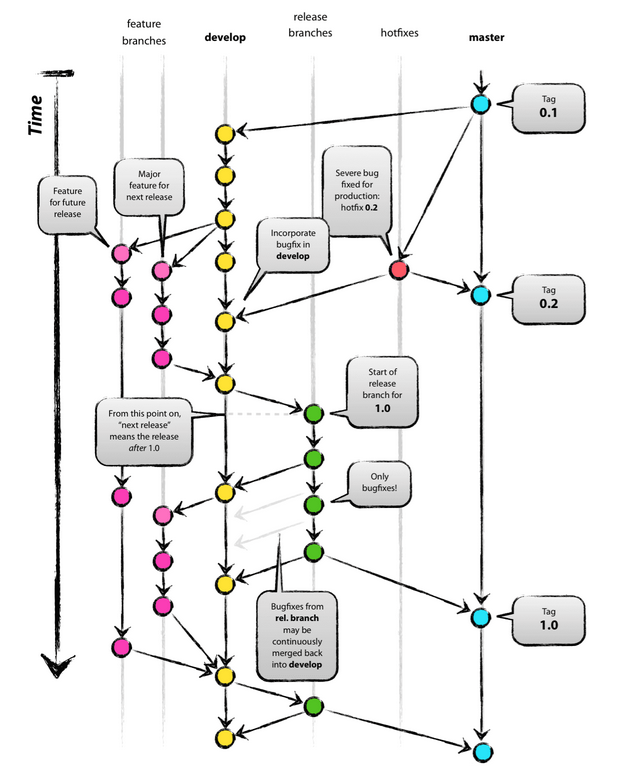
git is a revision control system that helps you manage modifications to your work. It lets you backtrack if things go wrong, and in team projects it helps coordinate modifications. It's free, and can be used across the Web. Even so, because it's designed to cope with complex situations like the one on the right (it was designed to deal with the Linux source code) it can seem like overkill in simpler situations. And you can get yourself in a tangle. Don't panic - there's always a way out.
This exercise is written primarily for Unix users working from the command line, so here's a crib sheet of Unix commands.
ls- list files in the current foldermkdir folder_name- make a new folder (unix calls folders directories)cd folder_name- go to the named folderpwd- find out which folder you're inmore file_name- display the contents of file_name on the screenecho text > file_name- put the text into the file, overwriting what was there, creating the file if necessaryecho text >> file_name- append the text to the file[up arrow]- retrieve the previous line. You can use this repeatedly, and edit the retrieved line. Wherever the cursor is, pressing the Enter key will run the whole line
The online version of this document is at http://www-h.eng.cam.ac.uk/help/unix/git/exercise.html. More information is available from http://www-h.eng.cam.ac.uk/help/unix/git.
Setting Up
The git commands store the updater's name and can sometimes start editors. Running the following commands will stop git warning you that you've not configured your set-up. You can do the first worked example below without any of these being correct (you won't need an editor, and all the files are temporary). On Linux you could set the editor to be emacs.
git config --global user.name "Your Name"
git config --global user.email YourEmailAddress
git config --global core.editor YourEditor
A worked example - one user, one repository
Here I add a line to a file each time using the echo command, but you could edit the file instead
- Create an empty folder and create a repository (a place to store git's files)
mkdir /tmp/gittest1
cd /tmp/gittest1
git init
- Create a file called
one, tellgitthat you want to keep track of it, then store the current version of it and give the version a name. If thecommitcommand warns about your configuration, try the Setting Up commands.echo first line > one git add one git commit -m "a one liner" git tag -a -m "base level" base
Thegit addcommand adds the named file to the list of files thatgit commitwill save. You don't have to add a tag, but as you'll see later, it makes jumping between versions easier. - Add another line to the file and save a version. Note that this time the
commitcommand has a "-a" flag, meaning that it will save all the files (i.e. we don't need use "add" to specify which files to save). Then do it again.echo second line >> one git commit -a -m "a two liner" echo third line >> one git commit -a -m "a three liner"
If you type more one you'll see that your "one" file will now contain
first line
second line
third line
Now you can view the structure of the current project using
git log --graph --oneline --decorate --all
which displays something like this (your numbers will be different)
* 0ad5dd6 (HEAD, master) a three liner
* 265211c a two liner
* 66b374a (tag: base) a one liner
Each of these lines denotes a stage that you can go back to. To return to the start, type
git checkout base
(don't worry about the long note that git displays) or use the numerical name - in this case 66b374a
git checkout 66b374a
If you look at the "one" file now using more one, you'll see your original version
first line
If you type
git checkout master
more one
you'll see your newest version again. For a small, single user project, this may be all you need to know about git. If you type
git commit -m "a comment"
every so often during your project you'll build up a sequence of back-up versions of your work without cluttering your folder. At any time you can do
git log- to get a list of dates when you committed things, and what you committed.git diff ...- to compare versions. For example,git diff base master
will show the differences between your first and final versions (in a format that you'll soon get used to).
Your folder won't be cluttered - everything's in the .git folder. If you set up a remote repository and do git push after each commit, you'll have a remote backup of your work. Better safe than sorry.
Branches
This project has developed linearly so far. Let's suppose you're already having second thoughts about how you project's developing. Typing
git checkout base
git checkout -b bough
goes back to the start and gets ready to produce a branch called "bough". Doing
echo a new idea >> one
git add one
git commit -m "along the branch"
git log --graph --oneline --decorate --all
produces something like
* 3246626 (HEAD, bough) along the branch
| * 0ad5dd6 (master) a three liner
| * 265211c a two liner
|/
* 66b374a (tag: base) a one liner
showing that now there are 2 tracks of development from base- the current one (shown as a vertical line leading to "bough") and the one we first produced (the "master").
To create a new branch named "experimental1" without checking it out, use
$ git branch experimental1
If you now run
git branch
you’ll get a list of all existing branches:
* bough
  experimental1
  master
The "experimental1" branch is the one you have just created, and the "master" branch is a default branch that was created for you automatically. The asterisk marks the branch you are currently on. Type
git checkout experimental1
to switch to the experimental1 branch. We'll add text to the file, and commit the change:
echo an experiment >> one
git commit -a -m "my first experiment"
Add another branch now, and switch back to the master branch
git checkout bough
git branch experimental2
git checkout experimental2
echo another experiment  >> one
git commit -a -m "my second experiment"
git checkout master
If you look at the "one" file now (e.g. by typing more one) you'll see the three line version - because you’re back on the master branch. You can make a further change on the master branch. Let's add something
echo fourth line  >> one
git commit -a -m "a four liner"
By now the branches have diverged, with different changes made in each. Typing
git log --graph --oneline --decorate --all
will produce something like this -
* 7ad13d3 (HEAD, master) a four liner
* 97f7ec4 a three liner
* 999886f a two liner
| * ad63635 (experimental2) my second experiment
| | * 7e4e446 (experimental1) my first experiment
| |/
| * a60312d (bough) along the branch
|/
* f5b2477 (tag: base) a one liner
Already you have 3 streams of development on the go, and different versions of each. This is typical when writing a program (or a poem come to that). Suppose now that you thought experimental1 was a good idea. To try merging the changes into the master sequence, run
git merge experimental1
If the changes don’t conflict, the merge will be done automatically. If, as here, the two strands of development conflict, you'll get a message something like
Automatic merge failed; fix conflicts and then commit the result.
Markers will be left in the problematic files showing the conflict. If you do more one you'll see that it's been changed -
first line
<<<<<<< HEAD
second line
third line
fourth line
=======
a new idea
an experiment
>>>>>>> experimental1
This shows you that the 2 versions have a line in common but then differ - above the "=======" line is the master version, and below is the experimental1 version. Typing
git diff
will also show the differences. You will need to edit the one file to merge the 2 version manually. You could for example make the contents of one be
first line
second line
third line
a new idea
an experiment
You can then type
git commit -a -m "merged version"
to commit the result of the merge. At this point you could delete the experimental branch with
$ git branch -d experimental1
Typing
git log --graph --oneline --decorate --all
now displays something like
*   6f804c4 (HEAD, master) merged version
|\
| * f7da77f my first experiment
* | b52fa9c a four liner
* | 0ad5dd6 a three liner
* | 265211c a two liner
| | * d8931e0 (experimental2) my second experiment
| |/
| * 3246626 (bough) along the branch
|/
* 66b374a (tag: base) a one liner
 showing the merge and the abandoned
 experimental2 branch. If you type
git diff master experimental2
You'll get
diff --git a/one b/one
index ffea0ad..1436297 100644
--- a/one
+++ b/one
@@ -1,5 +1,3 @@
 first line
-second line
-third line
 a new idea
-an experiment
+another experiment
showing which lines the 2 versions have in common ("first line" and "a new idea") and which lines are in one version but not the other (denoted by the - and + symbols). Some versions of git show the differences in a friendlier way, colour coding the changes. Also they show the versions and branches in a friendlier way (see right).
detached HEAD
 Normally the HEAD variable stores the name of a branch-end. However, git also allows you to check out an arbitrary commit that isn’t necessarily the tip of any particular branch. In this case HEAD is said to be "detached". If you continue the above example by doing
git checkout base
you'll be told "You are in 'detached HEAD' state". It's important to know that you're in that state because if you make changes to files and commit them, they'll disappear the next time you do a checkout, so beware.
Names
Descriptive text ("tags")can be added to nodes. There are 2 types of tags. Annotated tags are meant for release while lightweight tags are meant for private or temporary object labels. For this reason, some git commands for naming objects (like git describe) will ignore lightweight tags by default.
See Also
Our git page has more worked examples. Also there's
- GPRS tutorial - an 83 page PDF document with many worked examples
- gittutorial - A tutorial introduction to Git - has a useful section on "Using Git for collaboration"
- gitworkflows - An overview of recommended workflows with Git
- Version Control with Git
- Tutorials
- git-guide
- a simulator
- A book (500+ pages)
Some of these quickly become detailed. A git cheat sheet might be useful.
- © Cambridge University, Engineering Department, Trumpington Street, Cambridge CB2 1PZ, UK (map)
Tel: +44 1223 332600, Fax: +44 1223 332662
Privacy policy
Contact: helpdesk