
wxWidgets
wxWidgets is a way to write Graphical User Interfaces (GUIs, with buttons, menus, etc) for Win32, Mac OS X, etc from C++, Python, Perl, and C#/.NET. It's used in our IIA Software Engineering Project. Though it's cross-platform, the resulting programs don't look the same on all machines - they follow the look-and-feel of the machine.
This document briefly introduces wxWidgets 2.8 when used with C++, highlighting a few issues that sometimes puzzle newcomers.
Programming style
Whereas other graphics libraries we use at CUED (OpenGL and GLUT) aren't Object-Oriented, wxWidgets is, so you need some awareness of using C++ classes.
wxWidgets also uses Macros: they're not difficult, but you may not have seen them before. By convention they have upper-case names (e.g. IMPLEMENT_APP). They're not functions - the pre-processor expands them into "inline" C/C++ before the code reaches the compiler. Here's an example of writing and using a macro to convert Celsius to Fahrenheit
#define CTOF(x) ((x*1.8) +32)
...
float fboilingpoint=CTOF(100);
The real compiler never sees CTOF - it sees float fboilingpoint= ((100*1.8) +32);. The macros used in wxWidgets are much more developed than this. In particular, the IMPLEMENT_APP macro creates a main function.
Note also that in C++ you don't always need to supply all the parameters to a function. Many wxWidget routines use this facility to help make programs shorter. Any parameter with a = sign after it in the function parameter list can be left out as long as there are no more following parameters. The omitted parameters are given the stated default values.
Concepts
The basic concepts are much the same as in most graphics systems.
- Widgets (things - windows, buttons, etc). These have properties like color, size, etc. Some widgets (e.g. frames) can have other widgets inside them. wxGLCanvas is a useful widget that allows you to use OpenGL commands in a window. This lets you use advanced graphics. For simpler drawing you can use the wxDC widget.
- Events (triggering actions - keypresses, window resizing, mouse clicks, etc). When an event happens, your program might want to react to it. You can arrange for particular events in certain widgets to cause a routine to run. These routines are refered to as "callbacks" or "handlers".
- Sizers - these are layout managers: they organise widgets when they're within other widgets. If for example you have a row of buttons in a panel, you don't have to calculate sizes and coordinates when the main window is resized. If you specify for each button a minimal size, a stretch factor, a border, and what's to the left of it, the sizer routine will manage the re-drawing.
Programs with GUIs often have quite a different organisation to non-GUI programs. wxWidgets-based programs for example don't even have have an explicit main procedure. What you do is create the widgets and set things up so that the appropriate callbacks are called. Then you call the main event-loop, giving control over to the application. From then on, the program waits for events. When they happen, the program calls the appropriate callback then waits for the next event. Exiting the loop exits from the program.
Writing a program
Here are the main steps. Full code is in the next section
-
You first need to create a class derived from wxWidgets' wxApp class. Here's
an example.
class MyApp: public wxApp
{
 public:
  bool OnInit(); // automatically called when the application starts
};
Then calling the macroIMPLEMENT_APP(MyApp)
will create an object of that type and call its OnInit() member function. - You'll need to write the OnInit function, which would normally create windows. Here's a minimal example which uses a routine from the GLUT library, a library with some routines that might be useful later -
  glutInit(&argc, argv);
  MyFrame *frame = new MyFrame(NULL, "Testing", wxDefaultPosition,  wxSize(250, 150));
  frame->Show(true);
  return(true); // enter the GUI event loop
- Create the frame class -
class MyFrame: public wxFrame
...
The wxFrame class provides a frame window - a window whose size can be changed. The MyFrame class constructor is where various widgets will be created. - Then deal with events - an "event table" like the one below tells wxWidgets how to map events to member functions.
DECLARE_EVENT_TABLE
BEGIN_EVENT_TABLE(MyFrame, wxFrame)
  EVT_MENU(wxID_EXIT, MyFrame::OnExit)
  EVT_BUTTON(1, MyFrame::OnButton1)
  EVT_BUTTON(2, MyFrame::OnButton2)
END_EVENT_TABLE()
The BEGIN_EVENT_TABLE macro declares that MyFrame, which is derived from wxFrame, owns this event table. - Write the handlers - The type of parameter given to the handlers depends on the event. For size events, wxSizeEvent is used. For menu commands and most control commands (e.g. a button), wxCommandEvent is used.
Compiling an example
This compile line
g++ -o foo foo.cc `wx-config --cxxflags` `wx-config --libs` -lglut -lGL -lGLU
(the quote-marks go from top-left to bottom-right) will compile the following code (foo.cc) producing a program called foo (if you get a warning about a deprecated or antiquated header don't worry).
// Adapted from an example by Dr Gee (CUED)
#include <wx/wx.h>
#include <GL/glut.h>
#include <iostream>

class MyFrame: public wxFrame
{
 public:
  MyFrame(wxWindow *parent, const wxString& title, const wxPoint& pos,
          const wxSize& size);
 private:
  void OnExit(wxCommandEvent& event) { Close(true); };
  void OnButton1(wxCommandEvent& event) {
       std::cout << "Button 1 Pressed" << std::endl;
  };
  void OnButton2(wxCommandEvent& event) {
       std::cout << "Button 2 Pressed" << std::endl;
  };
  DECLARE_EVENT_TABLE()
};

BEGIN_EVENT_TABLE(MyFrame, wxFrame)
  EVT_MENU(wxID_EXIT, MyFrame::OnExit)
  EVT_BUTTON(1, MyFrame::OnButton1)
  EVT_BUTTON(2, MyFrame::OnButton2)
END_EVENT_TABLE()

MyFrame::MyFrame(wxWindow *parent, const wxString& title, const wxPoint& pos,
         const wxSize& size):
  wxFrame(parent, wxID_ANY, title, pos, size)
{
  wxMenu *fileMenu = new wxMenu;
  // The '&' in the next line underlines the succeeding character
  fileMenu->Append(wxID_EXIT,  wxT("&Quit"));
  wxMenuBar *menuBar = new wxMenuBar;

  menuBar->Append(fileMenu,  wxT("&File"));
  SetMenuBar(menuBar);

  wxBoxSizer *button_sizer = new wxBoxSizer(wxHORIZONTAL);
  button_sizer->Add(new wxButton(this, 1,  wxT("button 1")), 0,
                wxALL, 10);
  button_sizer->Add(new wxButton(this, 2,  wxT("button 2")), 0,
                wxALL, 10);
  button_sizer->Add(new wxStaticText(this, wxID_ANY,  wxT("Some Text")), 0,
                wxTOP|wxLEFT|wxRIGHT, 10);
 SetSizer(button_sizer);
}

class MyApp: public wxApp
{
 public:
  bool OnInit() {
  // glutInit cannot cope with Unicode command line arguments, so we pass
  // it some fake ASCII ones instead
  char **tmp1; int tmp2 = 0; glutInit(&tmp2, tmp1);

  MyFrame *frame = new MyFrame(NULL,  wxT("Testing"), wxDefaultPosition,
                       wxSize(250, 150));
  frame->Show(true);
  return(true); // enter the GUI event loop
  };
};

IMPLEMENT_APP(MyApp)
The following part of the constructor for MyFrame may need an explanation.
MyFrame::MyFrame(....):
  wxFrame(parent, wxID_ANY, title, pos, size)
When a derived object is created, it will by default first call the default constructor of the class it's derived from. In this case however, we don't want to call wxFrame's default constructor, we want to pass some arguments down. It's a constructor "with a member initialiser list"
Troubleshooting
If your program compiles but doesn't work properly
- Start from an example that works.
- Check to see if you're using a faultly implementation - the code's supposed to work the same on all platforms, but that's not always so in practise.
- Code that works with one version of wXwidgets may not work with another. For example, wxFD_OPEN only appeared in version 2.8. To write code that works with new and older versions you can try using wxFD_OPEN and adding
#if (wxMINOR_VERSION < 8)
#define wxFD_OPEN wxOPEN
#endif
to your source - Note that unless wXwidgets is installed with the --with-opengl configure option, the wxGLCanvas class (which displays OpenGL graphics) won't be supported.
Strings
You've already met C strings (character arrays) and C++ strings (the string data type). wXwidgets has its own string type called wxString which they suggest you use throughout your program - it has better internationalisation support as well as the features that C++ strings offer. See Converting everything to and from wxString for further information. To convert from a C++ string to a wxString you can try the following
  string s="hello";
  wxString mystring(s.c_str(), wxConvUTF8);
If you want to access the strings from the command line you need to remember that the argv available is of type wxChar **. Maybe there's a way to deal with them neatly. What I've done here is to construct a wxString from the individual wxChars, then converted the wxString into other forms.
for (int i=0;i<wxAppConsole::argc;i++) {
  char chars[1000];
  string cppstr;
  wxString s;
  for (int j=0; argv[i][j];j++)
      s=s+argv[i][j];
  cppstr=s.mb_str(wxConvUTF8);
  strcpy(chars,cppstr.c_str());
  cout << "C++ string=" << cppstr << " char array=" <<  chars << endl;
}
Finding windows
After creating a window or a button, you may need to access it again from a different function from where it was created. To do this you'll need to store the value returned when the window was created and make that value visible from elsewhere. Alternately you can use wXwidget's FindWindowByName function to find the window when you need it.
Scrollbars
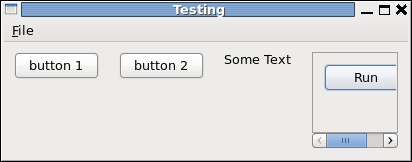 A varient of the wxWindow called wxScrolledWindow can be used if you want scrollbars with automatic callbacks. Compared with the previous program the program below has an extra window with a Run button. This extra window has scrollbars that will only appear when the displayed window dimensions are less than the actual window size (in the illustrated situation the displayed width but not the height is too small). If you call the source code below foo.cc you should be able to compile it using
g++ -o foo foo.cc `wx-config --cxxflags` `wx-config --libs` -lglut -lGL -lGLU
to produce a program called foo.
// Adapted from an example by Dr Gee (CUED)
#include <wx/wx.h>
#include <GL/glut.h>
#include <iostream>

class MyFrame: public wxFrame
{
 public:
  MyFrame(wxWindow *parent, const wxString& title, const wxPoint& pos,
          const wxSize& size);
 private:
  void OnExit(wxCommandEvent& event) { Close(true); };
  void OnButton1(wxCommandEvent& event) {
       std::cout << "Button 1 Pressed" << std::endl;
  };
  void OnButton2(wxCommandEvent& event) {
       std::cout << "Button 2 Pressed" << std::endl;
  };
  DECLARE_EVENT_TABLE()
};

BEGIN_EVENT_TABLE(MyFrame, wxFrame)
  EVT_MENU(wxID_EXIT, MyFrame::OnExit)
  EVT_BUTTON(1, MyFrame::OnButton1)
  EVT_BUTTON(2, MyFrame::OnButton2)
END_EVENT_TABLE()

MyFrame::MyFrame(wxWindow *parent, const wxString& title, const wxPoint& pos,
         const wxSize& size):
  wxFrame(parent, wxID_ANY, title, pos, size)
{
  wxMenu *fileMenu = new wxMenu;
  // The '&' in the next line underlines the succeeding character
  fileMenu->Append(wxID_EXIT,  wxT("&Quit"));
  wxMenuBar *menuBar = new wxMenuBar;

  menuBar->Append(fileMenu,  wxT("&File"));
  SetMenuBar(menuBar);

  wxBoxSizer *button_sizer = new wxBoxSizer(wxHORIZONTAL);
  button_sizer->Add(new wxButton(this, 1,  wxT("button 1")), 0,
                wxALL, 10);
  button_sizer->Add(new wxButton(this, 2,  wxT("button 2")), 0,
                wxALL, 10);
  button_sizer->Add(new wxStaticText(this, wxID_ANY,  wxT("Some Text")), 0,
                wxTOP|wxLEFT|wxRIGHT, 10);
 SetSizeHints(400, 100);
 SetSizer(button_sizer);
 wxScrolledWindow* controlwin = new wxScrolledWindow(this, -1, wxDefaultPosition, wxDefaultSize, wxSUNKEN_BORDER|wxHSCROLL|wxVSCROLL);
 button_sizer->Add(controlwin,1,
                wxEXPAND | wxALL, 10);
  wxBoxSizer *button_sizer2 = new wxBoxSizer(wxVERTICAL);
  controlwin->SetSizer(button_sizer2);
  controlwin->SetScrollRate(10, 10);
  controlwin->SetAutoLayout(true);

  button_sizer2->Add(new wxButton(controlwin, wxID_ANY, wxT("Run")), 0, wxALL, 10);

}

class MyApp: public wxApp
{
 public:
  bool OnInit() {
  // glutInit cannot cope with Unicode command line arguments, so we pass
  // it some fake ASCII ones instead
  char **tmp1; int tmp2 = 0; glutInit(&tmp2, tmp1);

  MyFrame *frame = new MyFrame(NULL,  wxT("Testing"), wxDefaultPosition,
                       wxSize(250, 150));
  frame->Show(true);
  return(true); // enter the GUI event loop
  };
};

IMPLEMENT_APP(MyApp)
Sources of wxWidgets information
You'll need to find some on-line information. Make sure that the wxWidgets release you're using matches what the documentation describes (type "wx-config --release" to see what's installed). Here are some suggestions
- wxWidgets Discussion Forum
- wxWiki main page
- A simple Tutorial
- A list of classes sorted by category
- Overviews (Events, etc)
See Also
- Using GLUT
- Using GLUI (a simpler way to produce simple GUIs)
- Using GLUE (a simple way to produce simple graphical programs with buttons)
- OpenGL
- Internationalization
Sample code and demos are online, though they might be too old or too new to work on your system. Problems include
- Strings - With some releases (but not 2.9) you need to use wxT for strings, so if you download a 2.9 demo for use with wxwidgets 2.8 you may need to put wxT(...) around strings
- Scrolling - In 2.9, wxScrolled is a template. In such cases,
- wxScrolledWindow is actually wxScrolled<wxPanel>, and is equivalent to wxScrolledWindow from earlier versions.
- wxScrolledCanvas is actually aka wxScrolled<wxWindow> and doesn't handle children specially.
The Updating to the Latest Version of wxWidgets lists some other issues.