
1A C++ coursework, Lent Term
This is a more realistic exercise than last term's, in several ways -
- You'll write one big program. You can't deal with this as if it were a small project scaled up - you need to use new techniques of design and production
- You'll be given code that needs extending. You'll need to understand the code well enough to be able to work with it, but you needn't understand each line.
- You'll work in teams, one person doing "Part 1" while in parallel the other person does "Part 2".
This page currently shows both parts of this team project. To look at just part 1, click on this Part 1 button. To look at just part 2, click on this Part 2 button
Work through the document at your own speed. When you've finished Task 1 get a demonstrator to mark your work (4 marks). Then work separately, testing your own code as much as you can before trying to combine your work into a single program.
Start sessions in the DPO by clicking on the  icon at the top-left of the screen, then clicking on the CUED 1st Year option, then on the Start 1ATrading option. This will put some icons on the screen for you, and give you a folder called 1ATrading.
If you have problems, the first thing to do is look at the 1AC++ Lent FAQ (Frequently Asked Questions)!.
Problem Statement: A Trading Problem [ back to contents]
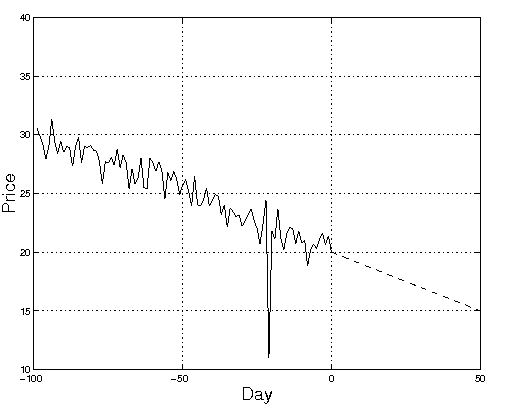
A company is required to purchase 1000 components within 50 days. The unit price of the components varies from day to day. At the close of trading on the previous day, the unit price was £20. The price variation over the previous 100 days is recorded in the file tradingData.dat and displayed below.
The company has £20000 assigned for the purchase of the components. Trading is to be performed automatically by a computer program. It can buy and sell any volume of components over the 50 day trading period but must ensure it has 1000 components at the end of the period and remains with a positive balance throughout the trading period.
You are required to design, implement, test and evaluate a program written in C++ to display and analyse the past trading price data. Your program should then connect to a trading exchange computer and automatically buy and sell components over the 50 day trading period to secure the purchase of 1000 components with the most money left in the bank.
The Software Design Process [ back to contents]
Software Engineering is the application of a systematic, disciplined, quantifiable approach to the development, operation and maintenance of software. As in other branches of engineering, one of the central ideas is that of decomposing a large difficult problem into a set of simpler sub-problems. These sub-problems may then be further decomposed into yet smaller sub-problems until a level of complexity is reached at which the solution becomes relatively trivial.
The following information will guide you through these activities and help you to design and implement a working solution. The first stage has already been carried out for you.
Solution Specification and Problem Modularisation (CHECKLIST) [ back to contents]
You should design a solution with the following specification. The program should:
- Read the trading price data
Read the data (price over the previous 100 days) from the file tradingData.dat and store in a data structure (e.g. ModelData).
- Analyse the price variation over the past 100 days
Estimate the parameters of a linear model by fitting a straight line to the data using the method of least-squares.
- Display graphs
Display the trading data graphically using GLUE library functions. Superimpose the best-fit line on the display of the data.
- Compute the statistics
Find the biggest daily rise and fall. Compute the mean and variance of the errors between the actual price and the model's prediction. Output these values to the screen. Check that the data agrees with the model.
- Initialise trading account
Use the trading exchange library function TE_InitialiseTrading() to establish a connection with the electronic trading exchange server.
- Perform trading
Use the trading exchange library function TE_GetPrice() to get each day's price (for day 1 to 50).
Devise your own trading strategy to determine when to buy and sell and the volume of the transaction.You must ensure a positive balance at all times and have at least 1000 units at the end of the trading period (i.e. on day 50).
Implement your strategy for each day by deciding on whether to buy or sell (i.e. transaction type) and how much to buy or sell (i.e. the volume of the transaction). Use the trading exchange library function TE_Trade() to perform the transaction. Deal first with situations where commission is 0, then deal with non-zero commissions.
At the end of trading on each day determine the new stock and balance and update your accounts (e.g. using the TradingAccount data structure).
Your code needs to be shipped into your shared folder (1ASoftwareDesign), re-compiled, and tested with all the data test sets.
- Store your trading account information in a file and compare to the trading exchange's records
Output a record of your trading accounts (day, price, transaction type and volume, stock and balance) to a file (you can store 50 days of information for just one data set or for all of them - up to you).
The trading exchange library function TE_CloseTrading() will tell you your balance and the number of components (stock) at the end of trading. Check that these agree with your own accounts.
- Print the total of all your final balances
Put the code to initialise trading, perform trading, and close trading in a loop and display onscreen the total of the 20 final balances.
Note that you can (indeed, should) check for yourself whether you've successfully completed each of these tasks. For example, think about what the value of mean should be.
High-Level Design [ back to contents]
Modularisation [ back to contents]
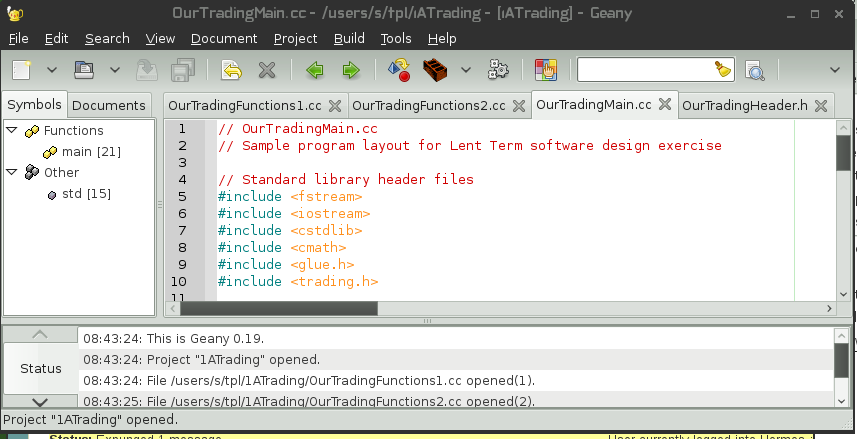
Now we start transferring the design to C++. Here's the supplied top-level file. It's mostly comments at the moment (the final version will be about twice as long). Note that it closely follows the earlier design modularisation.
// OurTradingMain.cc
// Sample program layout for Lent Term software design exercise

// Standard library header files
#include <iostream>
#include <fstream>
#include <cstdlib>
#include <cmath>
#include <glue.h>
#include <trading.h>

// User-defined constants, data structures and
// function declarations
#include "OurTradingHeader.h"

using namespace std;

// Declare data to be an object of type ModelData
// Put it outside of main otherwise your graphics routine
// won't be able to use it.

int main()
{
   // Declare account to be an object of type TradingAccount
   // Call to function to read trading price data from file
   // Call to function to calculate linear model
   // Call to function to calculate statistics

   // Call to function to initialise trading account
   // Call to function to trade and update accounts
   // Call to function to close trading and output accounts
   // Call functions to set up graphics. glueGo() needs to be the last
   // function you call.
   glueWindow();
   graphicsfunction(mygraphics);
   glueGo();
   return 0;
}

// Function definitions of part 1 and 2 are in separate files
// called OurTradingFunctions1.cc and OurTradingFunctions2.cc
Your program will be constructed modularly by dividing it into two parts (modules): data analysis and trading. Each partner will be responsible for the implementation and testing of a module.
Multiple Source Files [ back to contents]
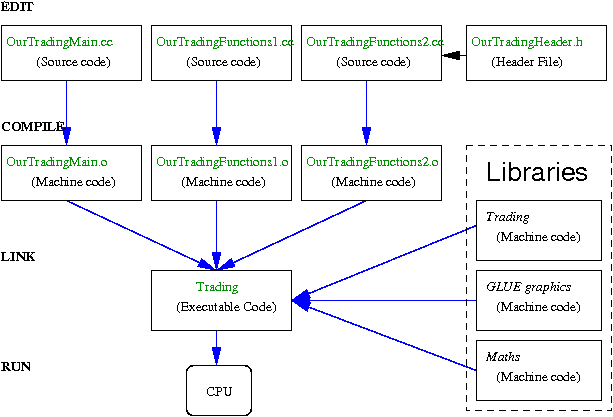
The design exercise will require you to create a program for which different parts of the C++ source code will be in different files, all with the same base name, OurTrading.
- The main program file - OurTradingMain.cc - will contain the main() routine with function calls to implement the different parts of the program (see example above).
- The header file - OurTradingHeader.h - will
contain the definitions of the data structures and the declaration of all
user-defined functions (i.e. a list of function prototypes
developed by you and your team partner). Because all the other files need to know this information, the other files have
#include "OurTradingHeader.h"
which essentially copy-pastes the contents of the header file at compile-time. See next section for an example. - The function definitions will be placed in two separate source files. The source code for the function definitions of part 1 (first partner) should go in the file OurTradingFunctions1.cc.
- The source code for the function definitions of part 2 (second partner) should be placed in a separate file called OurTradingFunctions2.cc.
Editing and Compiling Project Files [ back to contents]
The only way to produce a working program is to load all the necessary source files in. We've creates a geany "project file" for you that tells geany which files comprise your project and also how geany can create a working program from the source files. So first, load the project file into geany (loading in the files one at a time won't work).
To do that, click on the  icon and choose the Open
option from the Project menu. Load the project file that's in your 1ATrading folder (it's called 1ATrading.geany). You should get a
window like this
icon and choose the Open
option from the Project menu. Load the project file that's in your 1ATrading folder (it's called 1ATrading.geany). You should get a
window like this
The complete program can be created by using the Make item in the Build menu. This compiles the functions in the files OurTradingFunctions1.cc and OurTradingFunctions2.cc and then links their object code with the routines from the standard libraries and the compiled version of OurTradingMain.cc. The "brick" button just compiles the current source file but doesn't make a new program - so don't use it! Clicking the gear-wheel icon will execute the complete and integrated program.
Data Structures [ back to contents]
For this design exercise two data structures have already been designed for you (defined below) and can be used without modification for storing data.
The ModelData class [ back to contents]
The ModelData class is made up of 10 fields and can be used for the first part of the project to store the trading data and the linear model parameters and least squares analysis.
     class ModelData{
        public:
        int numPoints;
        float x[MAXSIZE];
        float y[MAXSIZE];
        float a;
        float b;
        float residual[MAXSIZE];
        float mean;
        float variance;
        float biggestDailyRise;
        float biggestDailyFall;
     };
The day and price data can be stored as arrays in the x and y fields.
The model parameters of y = a +bx can be stored in the a and b fields.
The remaining fields can be used to store the residual errors (also an array) between the model data and actual data and the mean and variance of these errors. The biggest daily rise and fall values will be stored in the biggestDailyRise and biggestDailyFall fields.
Remember that the data members of a class are accessed and assigned values by specifying the field and using the dot operator. For example:
     ModelData data;

     data.x[0] = 1.0;
     data.y[0] = 30.6;
declares data to be a class of type ModelData and assigns 1.0 and 30.6 to the first elements of the x and y arrays respectively.
The TradingAccount class [ back to contents]
The TradingAccount object can be used for the second part of the project to keep a record of the price and transactions performed with the electronic trading exchange.
     class TradingAccount{
        public:
        int today;
        float price[MAXSIZE];
        int transaction[MAXSIZE];
        int volume[MAXSIZE];
        int stock[MAXSIZE];
        float balance[MAXSIZE];
        float commission;
     };
The today field should record the number of valid entries in the arrays. This should be set to the number of days in which trading has taken place. The commission is filled in for you when you call InitialiseAccount - it's a fixed-price commission (not a percentage) that you pay whenever you buy or sell any number of items (not when you pass). You pay it even if you sell/buy 0 items, and you have to pay it before the transaction. The remaining fields can be used to record the price, transaction type (buy, sell or pass), volume of trading and the stock and balance at the end of each day of trading. The index of these arrays refers to the trading day. For example:
     TradingAccount account;
     account.price[0] = 20.0;
     account.balance[0] = 20000.0;
declares account to be a variable of type TradingAccount and sets the value of the first element of the price and balance arrays (day 0) to be 20.0 and 20000.0 respectively.
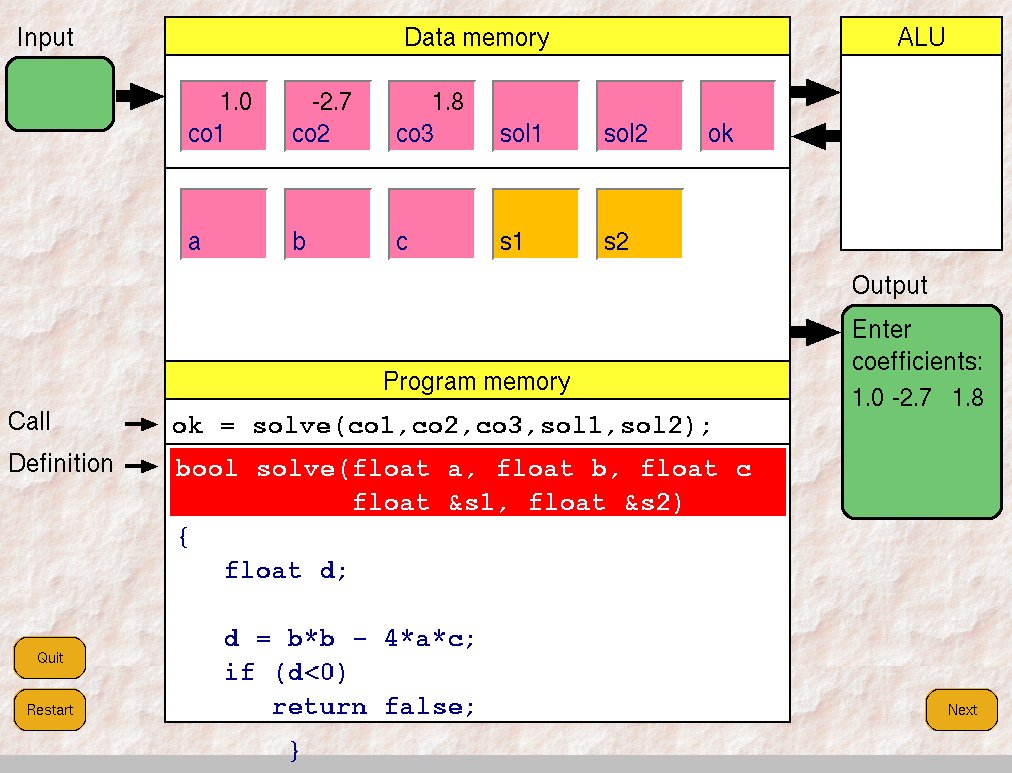
Passing by reference [ back to contents]
In this design exercise the data members of data structures of these types should be processed by passing them to functions using passing by reference. This allows the function to read and change the value of any of the data members. Passing by reference is indicated by including the symbol & in the prototype. For example the function prototype:
void ReadDataFile(ModelData& data)
indicates that an object of type ModelData is passed to the function ReadDataFile() and that the function can read and reassign the values of any of the data members. If you don't understand passing by reference, look at the example in the FAQ.
The Project Header File [ back to contents]
Class definitions and declarations of constants should be placed in the project header file OurTradingHeader.h. The contents of this file becomes available to a source file by using the #include "OurTradingHeader.h" directive at the top of the file. A working copy of OurTradingHeader.h can be found in your 1ATrading directory.
// OurTradingHeader.h -  Included at top of all project files.
// Project header file for trading exercise. Contains definitions
// of constants, data structures and function declarations


// Constants
const int MAXSIZE = 100;
const int LABGROUP = 999; // you need to change this
const int SECURITYCODE = 1125; // you need to change this

// User definition of a data structure for least squares analysis
// x, y and residual are arrays of type float
class ModelData{
   public:
   int numPoints;
   float x[MAXSIZE];
   float y[MAXSIZE];
   float a;
   float b;
   float residual[MAXSIZE];
   float mean;
   float variance;
   float biggestDailyRise;
   float biggestDailyFall;
};

// User definition of a data structure for the trading accounts
class TradingAccount{
   public:
   int today;
   float price[MAXSIZE];
   int transaction[MAXSIZE];
   int volume[MAXSIZE];
   int stock[MAXSIZE];
   float balance[MAXSIZE];
   float commission;
};

// User-defined function declarations for part 1
void ReadDataFile(ModelData& data);
void mygraphics(int w, int h);

// User-defined function declarations for part 2
void InitialiseAccount(int dataSet, int labGroup, int securityCode,
     TradingAccount& account);
void HandleExitCode(int errorCode);
Function Names and Prototypes [ back to contents]
After selecting the key variables and data structures you should agree with your partner on the interface between different parts of the program. In particular you must specify the interface between all the functions.
For each function this will require you to fix:
- Function parameters: Specify the type and name of all parameters and whether they will be passed by value or reference.
- Return type: Agree on the type of the value returned. If no value is returned by the function the return-type will be void.
- Function name: Choose a name for your function.
For example, a suitable prototype for the function to read the trading price data from a file is:
void ReadDataFile(ModelData &data);
A suitable prototype for the function to initialise an electronic trading account is:
void InitialiseAccount(int dataSet, int labGroup, int securityCode, TradingAccount &account);
These 2 prototypes (and the associated functions) have been written for you.
Task 1 (4 marks) [ back to contents]
Specify the prototypes of all of the functions for part 1 and part 2, listed below. You and your team partner are required to implement the following functions.
Part I Requirements [ back to contents]
- Function to read trading price data from file (already implemented)
- Function to calculate linear model by method of least-squares
- Function to calculate statistics
- Function to display data using GLUE library routines (prototype done for you)
Part II Requirements [ back to contents]
- Function to initialise trading account (already implemented)
- Functions to trade and update accounts over next 50 days
- Function (or functions) to close trading account, check your estimate of final stock and balance with what TE_CloseTrading returns, save account information to a file, and return the final balance.
Ask a demonstrator to check your list before proceeding. The function prototypes should be placed in the project header file, OurTradingHeader.h. Each source file (e.g. OurTradingFunctions1.cc) should #include this header file.
Implementation and Testing [ back to contents]
Getting Started [ back to contents]
You are in a
position to begin the implementation. If you have not already done so, log onto the
teaching system then use the icon at the top of the screen and then click on the CUED 1st Year option, then the Start 1ATrading option. This will create
a directory called 1ATrading. This contains incomplete but
working copies of the following files:
- A data file called tradingData.dat which contains the price data over the last 100 days.
- A sample header file, OurTradingHeader.h, which contains the definitions of sample data structures which should be used in the implementation of the solution.
- A program file called OurTradingMain.cc which contains a sample main() routine. This sample outlines the modules required and shows how they will be implemented by calls to functions.
- Two source files, OurTradingFunctions1.cc and OurTradingFunctions2.cc, containing the definitions of some of the functions that will be called from the main() routine. Each partner will add the C++ source code of the functions they implement to these files.
You'll also have a directory called 1ASoftwareDesign which can be read and written to by members of your team. This directory will be used for testing the final integrated product.
Testing an implemented function [ back to contents]
Two functions have already been designed and implemented in C++ for you. The functions ReadDataFile() and InitialiseAccount() are defined in OurTradingFunctions1.cc and OurTradingFunctions2.cc respectively. The functions you write are going to be created and tested in a similar way
You can check and test the supplied functions by going through the following stages
- Check the function source code - Check that the source code for the functions is in the project file OurTradingFunctions1.cc or OurTradingFunctions2.cc. Make sure you understand the C++ source code of the function definitions and how they use the data members of the data structures, data and account. Note that the data structures are passed to the functions by reference. Ask a demonstrator for help if you are unsure of any of the details.
- Check the function prototype in the project header file - Check that a function prototype is in the project header file OurTradingHeader.h.
- Add a Function Call -
Call the functions from the main() routine in the
main project file, OurTradingMain.cc. I suggest you add a further line to check whether the
data's being read in.
For example, you might want to add these statements:
     ReadDataFile(data);
     InitialiseAccount(TEST1, LABGROUP, SECURITYCODE, account);
     cout << "On day 5 of the historical data the price was "   << data.y[4] << endl;
You need to set appropriate values for LABGROUP and SECURITYCODE (see the TE_InitialiseTrading documentation for SECURITYCODE information). You will also have to declare the data structures that you will use (e.g. data and account). The comments in OurTradingMain.cc give more details. - Compile and link the project files - load the project file (1ATrading.geany) into the geany icon. Compile and link using the Make menu item.
- Execute the binary - Run the program (it's called Trading) by clicking on the gear-wheel icon. Does it print out what you expect?
Implementation of a function and unit testing [ back to contents]
You are now ready to implement your first function. Follow these steps for each function that you implement:
- Begin the implementation of each function by typing the function prototype (a copy should already have been included in header file) and opening and closing braces in one of the source files, e.g. OurTradingFunctions1.cc.
- Type in the body of the function and check the syntax of each statement.
- Mentally check that the function fits the requirements.
- Call the function from the main() routine in OurTradingMain.cc.
- Compile and link the project files using the Make menu item.
- Run the executable Trading to test the algorithm implemented.
- Proceed with the development cycle of editing, compiling and testing for syntactical and logical errors.
Notes on Implementation of Functions of Part I [ back to contents]
Reading from files [ back to contents]
The following function uses an ifstream (input file stream) object called fin to read the trading data from a file and store it in a user-defined data structure of type ModelData. The data structure is passed by reference. The function definition has been placed in OurTradingFunctions1.cc.
// Function that loads trading data from file. Price data is stored
// in the y field of an object of type ModelData
// Object is passed by reference (&)

void ReadDataFile(ModelData &data)
{
   char fileName[80] = "tradingData.dat";
   int number = 100;
   int day;
   float price;

   // Associate file name with fin object of class ifstream
   ifstream fin;
   fin.open(fileName);

   // Prompt for new file name if not able to open
   while(!fin.good())
   {
      cout << "Cannot open trading data file. Enter a new name: ";
      cin >> fileName;
      // once bad, the file stream will stay bad unless cleared
      fin.clear();
      fin.open(fileName);
   }

   data.numPoints = number;
   for(int i=0; i< number; i++)
   {
     fin >> day >> price;
     data.x[i] = day;
     data.y[i] = price;
   }

   fin.close();
}
Displaying data with the GLUE library functions [ back to contents]
GLUE (Graphics Library for Undergraduate Education) provides some C++ functions for doing simple graphics and plotting data. The provided code already creates a window for you. You need to add axes and draw a few lines. Use the move and draw commands so that they draw line segments from one (x,y) point to the next. The data is inside your ModelData object. To make the data available to your graphics routine you need
extern ModelData data;
near the top (just before the "using namespace std;" line for example) of the file where your graphics code is (you wouldn't normally use extern to make variables widely visible like this, but graphics are an add-on and require special treatment). Details about this are in the C++ FAQ.
Full details about graphics are on the GLUE page - you'll need to read at least some of this documentation (programming involves lots of reading). Use trial and error if you're unsure about things - you'll soon see if you're right or not. You only need add 8 lines of code.
An example of a program which uses these graphics functions can be found in PlotNormal.cc in your 1AC++Examples directory but DON'T copy lines from this file into your program unless you understand what they do - you're more likely to confuse yourself than solve the problem.
Method of Least Squares [ back to contents]
The method of least squares can be used to fit a straight line y = a + bx to a discrete set of data points (x1, y1) ... (xn, yn) where n>2. To calculate the values of the model, a and b, which minimise the sum of the squares of the errors (measured in the y-direction) of the data points to the straight line
- evaluate the sum of the x-values, y-values, x2 values and xy values (we'll call them Sx, Sy, Sxx and Sxy respectively).
- Calculate
a = (Sxx Sy - Sx Sxy)/(n Sxx - Sx Sx)
b = (n Sxy - Sx Sy)/(n Sxx - Sx Sx)
Analysis of Residual Errors [ back to contents]
After fitting the straight line to the data, we can analyse the residual errors εi. The error for each measurement, εi, is given by the difference between the measured value, yi, and the prediction based on the model:
εi = yi - (a + b xi)The sample mean (μ) and the sample variance (σ2) of the residual errors are given by:
- μ= Σεi/n
- σ2=Σ(εi-μ)2/(n-1)
where in both expressions i runs from 1 to n. The mean should be approximately zero if the linear model fits the data correctly. Use the fields (residual, mean and variance) of the ModelData object to record the residual errors εi, mean (μ) and variance (σ2) respectively.
Maximum daily rises and falls [ back to contents]
Think of a method to determine these values. There are fields in the ModelData object to store them.
Notes on Implementation of Functions of Part II [ back to contents]
Electronic trading library functions [ back to contents]
 The second part of the design exercise requires that you devise a
trading strategy for the next 50 days. Trading is to be carried out
automatically under computer control. You will need to call the
following library functions to interface with a networked trading
server that handles buying and selling of the components:
The second part of the design exercise requires that you devise a
trading strategy for the next 50 days. Trading is to be carried out
automatically under computer control. You will need to call the
following library functions to interface with a networked trading
server that handles buying and selling of the components:
- TE_InitialiseTrading - Establishes communication with the trading exchange server and initialises an account for the 50 day trading period.
- TE_GetPrice - Gets the quoted price for the component (to be called at the beginning of each day).
- TE_Trade - Makes a transaction (buying or selling an integer volume of components).
- TE_CloseTrading - Closes the trading account and disconnects from the electronic exchange. The function will return the final balance and stock at the end of the trading period recorded by the exchange.
You do not need to know how these library functions have been implemented. You are only required to understand how your program should interface with them. This information is readily available from the function prototypes (found in the header file trading.h and listed below) for the electronic trading library functions.
Below each prototype is a list of parameters. All these library functions return the integer value of an exit (error) code which is set to TE_OKAY (i.e. 0) if the function execution was successful. Any other return value indicates that an error has occurred.
- Initialise trading
int TE_InitialiseTrading(int dataSet, int groupNo, int securityCode, float &commission);
//
// Parameter list:
// dataSet      Which set of prices to use (TEST1, ... TEST20)
// groupNo      Lab Group Number
// securityCode The sum of the day of the month and the numbers in the
//              labgroup members' IDs. E.g. If users abc123 and xyz1001
//              do the lab on the 1st of Nov, the securityCode is 1125
//              (123+1001+1)
// commission   the fixed cost of each transaction (passed back by reference)
//
// Return values:
// TE_OKAY              trading session initialised (no error)
// TE_ALREADY_CONNECTED already connected to server
// TE_AUTH_FAILED       authorisation failed
- Get today's price
int TE_GetPrice(int day, float &price);
//
// Parameter list:
// day          trading day, starting at 1
// price        the price for today (passed back by reference)
//
// Return values:
// TE_OKAY          price will be valid (no error)
// TE_NOT_CONNECTED you weren't trading anyway
// TE_TOO_EARLY     cannot look into the future! - you must
//                  make a transaction before incrementing the day.
- Make a transaction
int TE_Trade(int transaction, int volume);
//
// Parameter list:
// transaction   buy, sell or pass (TT_BUY, TT_SELL or TT_PASS)
// volume        how many components to buy or sell (ignored for TT_PASS)
//
// Return values:
// TE_OKAY          transaction succeeded (no error)
// TE_NOT_CONNECTED you weren't trading anyway
// TE_NO_FUNDS      insufficient funds to buy that many
// TE_NO_STOCK      insufficient stock for sale
// TE_TOO_LATE      you have already made a transaction today
- Close trading account
int TE_CloseTrading(float &finalbalance, int &finalstock);
//
// Parameter list:
// finalbalance        balance at close of trading (passed back by reference)
// finalstock          number of components at close of trading (passed back by reference)
//
// Return values:
// TE_OKAY             request succeeded
// TE_NOT_CONNECTED    you weren't trading anyway
Note that the initial values given to TE_CloseTrading are ignored. The parameters which are passed by reference (indicated by the symbol & before the variable name in the prototype) will have their values changed by the library function. This applies also for the other functions. For example, to get the price on day=1 we can call the TE_GetPrice() function:
ec = TE_GetPrice(day, price);
and check that the return value of the function is TE_OKAY. If you don't check the returned value, you won't know if the function has failed. In this case, doing HandleExitCode(ec); can be used to check the return value. Alternatively you could get the price and check the return value in one line by doing
HandleExitCode(TE_GetPrice(day, price));
Sample function to initialise trading account and handle exit code [ back to contents]
An example of the implementation of a function to initialise the trading account and to establish a connection with the exchange is given below and listed in OurTradingFunctions2.cc.
The function is passed an object of type TradingAccount. The today data member of the data structure is used to record the trading day (e.g. on the first trading day today = 1). The other fields are used to record the price, transaction type (buy, sell or pass), number of components bought/sold, stock at the end of each transaction and the balance after each transaction. Trading can take place from day=1 to day=50.
The exit code (return value) of the library function is checked and an appropriate error message is produced if a connection was not established. The system library function, exit(), is used to terminate the program instead of the conventional return from the main function. This forces the program to terminate after detecting an error in one of the function calls.
The symbolic constants (integers) (e.g. TE_OKAY, TT_PASS) are defined in the following sub-section using enumerations.
// Function to initialise trading account and connect to exchange.
// Object is passed by reference
void InitialiseAccount(int dataSet, int labGroup, int codeNumber,
     TradingAccount &account)
{
   int ec, day= 0;

   // Set data members of TradingAccount object for day = 0
   account.today = day;
   account.price[day] = 20.0;
   account.transaction[day] = TT_PASS;
   account.volume[day] = 0;
   account.stock[day] = 0;
   account.balance[day] = 20000.0;

   // Call trading library function and handle exit (return) code
   ec = TE_InitialiseTrading(dataSet, labGroup, codeNumber, account.commission);
   HandleExitCode(ec);
}
// Function definition to display errors from trading exchange
// The program is terminated with exit(-1) if there is an error
void HandleExitCode(int errorCode)
{
  switch(errorCode)
  {
    case TE_OKAY: break;

    case TE_FAIL:
      cout << "Trading error: bad parameter." << endl;
      exit(-1);

    case TE_ALREADY_CONNECTED:
      cout << "Trading error: already connected to server." << endl;
      exit(-1);

    case TE_NOT_CONNECTED:
      cout << "Trading error: not connected to server." << endl;
      exit(-1);

    case TE_AUTH_FAILED:
      cout << "Trading error: authorisation failed." << endl;
      exit(-1);

    case TE_TOO_EARLY:
      cout << "Trading error: must agree price every day." << endl;
      exit(-1);

    case TE_TOO_LATE:
      cout << "Trading error: transaction already made today." << endl;
      exit(-1);

    case TE_NO_FUNDS:
      cout << "Trading error: insufficient funds for purchase." << endl;
      exit(-1);

    case TE_NO_STOCK:
      cout << "Trading error: insufficient stock for sale." << endl;
      exit(-1);

    case TE_SECURITY_PROBLEM:
      cout << "Wrong code number used for TE_InitialiseTrading." << endl;
      exit(-1);

    default:
      cout << "Trading error: trading system failure." << endl;
      exit(-1);
   }
}
MyTrader Function [ back to contents]
For each day of the trading period (from day=1 to day=50) you are required to:
- Get today's price by calling the trading library function TE_GetPrice. The quoted price is passed back by reference.
- Determine whether to buy, sell or not trade at this price (i.e. set the transaction-type) and the volume of trading. If the code to do this is non-trivial it's best put in a separate function. Begin with a simple strategy to ensure the purchase of 1000 components.
- Perform the transaction by calling the trading library function TE_Trade. The transaction must be one of TT_SELL, TT_PASS or TT_BUY. The volume must be an integer.
- Record the transaction by setting the price, transaction type, volume, stock and balance entries in the account data structure.
This can be done by defining a function, for example MyTrader below, which in turn calls other functions.
void MyTrader(TradingAccount &account, ModelData data)
{
     // Call library function to get today's price
     // Decide on transaction and volume
     // Call library function to trade
     // Call user-defined function to update accounts
}
Closing the account and writing the records to a file [ back to contents]
At the end of the trading period (on day 50) you should close the trading account by calling the TE_CloseTrading library function. The final balance and final stock recorded by the electronic trading exchange will be returned by reference. You must compare these values with the balance and stock entries for day 50 in your own records. Make the function that closes the trading return the final balance.
Record the accounts in a file (i.e. write a file - see lecture notes, the WWW, or the Mich term handout). Include price, transaction, volume, stock and balance details for each day.
Definition of trading library constants using enumeration [ back to contents]
The following symbolic constants are used in the electronic trading library functions. They have already been defined for you using enumeration statements. These definitions are found in the header file trading.h.
- Trading error codes
enum TrError {
   TE_OKAY = 0,
   TE_FAIL, TE_ALREADY_CONNECTED, TE_NOT_CONNECTED, TE_AUTH_FAILED,
   TE_TOO_EARLY, TE_TOO_LATE, TE_NO_FUNDS, TE_NO_STOCK, TE_SECURITY_PROBLEM,
   TE_NUM_ERROR_CODES
};
The enumeration is simply assigning integer values (0 to 9) to the symbolic constants (TE_OKAY ... TE_NUM_ERROR_CODES). You should use the symbolic constant names in your programs to make them more readable. - Training data sets
enum TrDataSet {
   TEST1 = 1,
   TEST2, TEST3, TEST4, TEST5, TEST6, TEST7, TEST8, TEST9, TEST10,
   TEST11, TEST12, TEST13, TEST14, TEST15, TEST16, TEST17, TEST18,
   TEST19, TEST20
};
Datasets TEST11 ...TEST20 have a non-zero commission. The others have a commission of 0. - Transaction types
enum TrTransType {
   TT_SELL = -1,
   TT_PASS =  0,
   TT_BUY  =  1
};
Integration, Final Testing and Evaluation [ back to contents]
Integration of Part 1 and 2 [ back to contents]
The final program should integrate all the tested and working functions.
When (and only when) the functions have been successfully tested, the source files should be copied (shipped) to the team directory, 1ASoftwareDesign (there's a link to it in each team-member's private folder), by dragging
them onto the desktop's
 icon.
The two files containing the working functions (OurTradingFunctions1.cc and OurTradingFunctions2.cc) and the trading data file (tradingData.dat)
can be shipped over and left unchanged.
You may need to create new, integrated versions of
OurTradingHeader.h and OurTradingMain.cc. Then load the
shared directory's project file into geany and create a new version of the program. Integration will be easier if you've done unit testing first.
icon.
The two files containing the working functions (OurTradingFunctions1.cc and OurTradingFunctions2.cc) and the trading data file (tradingData.dat)
can be shipped over and left unchanged.
You may need to create new, integrated versions of
OurTradingHeader.h and OurTradingMain.cc. Then load the
shared directory's project file into geany and create a new version of the program. Integration will be easier if you've done unit testing first.
Final Testing and Evaluation [ back to contents]
20 sets of sample data are available for testing by calling TE_InitialiseTrading() with the dataSet parameter set to one of TEST1, ...TEST20 (which have the values 1, ... 20). Datasets TEST1, ...TEST10 involve a commission of 0 - the others don't.
Put the code to initialise trading, perform trading, and close trading in a loop and display onscreen the total of the 20 balances.
Each time you run your trading program in the shared 1ASoftwareDesign directory, the trading server records your closing balance and compares it with other lab groups' balances. To see how your trading strategy faces up to the challenge, see the 1ALent Scores (entries are updated every 15 minutes from 9am to 8pm).
8 marks are for producing a working program (one that purchases 1000 components for all 20 scenarios and fulfills all the requirements of the Solution Specification (use it as a pre-flight checklist before you ask to be marked - have you produced a file? Have checked your final stock and balance values against the trading exchange's figures?). Up to 4 additional marks will be awarded for the quality of the solution (including simplicity and clarity), evidence of teamwork and the performance on the test data. You can update the graphics, improve the strategy, produce more statistics (e.g. assess how erratic the data is), have effective testing and evaluation procedures, or use more advanced C++ facilities to enhance your program (add member functions to classes; use vectors rather than arrays, etc.)
Troubleshooting [ back to contents]
Here are some extracts from the 1AC++ Lent FAQ (Frequently Asked Questions) file.
- How can I access the quiz again? - Go to the C++ quiz
 The Run button fails (it says it can't find a file, or mentions a file I don't have) even though Make works when I'm using my own files. What's wrong? - If you click in the brick or load in extra source files, geany can get confused. Shut down geany and double-click on the fixPrivateGeanyProject icon on the desktop. Then re-start geany and load the project file in (the real project file - not the one that geany claims was the last one used).
 When I load a shared
project in, it contains no source files, or I get a "no target" command when I try to use "Make", or it seems to be using my private files. What do I do? - Perhaps you've
accidentally removed the orginal project file, or confused geany by adding/removing source files. You can recover by shutting down geany, double-clicking on the fixSharedGeanyProject icon on the desktop, then re-start geany and loading the appropriate project file in (the real project file - not the one that geany claims was the last one used).
When I load a shared
project in, it contains no source files, or I get a "no target" command when I try to use "Make", or it seems to be using my private files. What do I do? - Perhaps you've
accidentally removed the orginal project file, or confused geany by adding/removing source files. You can recover by shutting down geany, double-clicking on the fixSharedGeanyProject icon on the desktop, then re-start geany and loading the appropriate project file in (the real project file - not the one that geany claims was the last one used).
Help and Further Reading [ back to contents]
You should first review your lecture notes. Animations and further explanations are available from CUED's 1A Computing Help page. Particular subjects are dealt with in the following places as well as in this document
- Understanding compiler error messages - FAQ
- Classes - FAQ; Tutorial Guide; animations
- Writing functions - FAQ; Tutorial Guide; animations
- Passing by reference - FAQ; Tutorial Guide; animations
- How to debug code - FAQ; our Debugging page
- Graphics - The PlotNormal example; Glue; your previous term's work
- Assessment - Checklist, League tables
Or mail Tim Love (tl136). Useful references include
- C++ How to Program (6th edition), Deitel, H.M and Deitel, P.J., Prentice Hall, Englewood (NJ), 2007. (a comprehensive treatment of the C++ Programming Language)
- Code Complete: 2nd edition, McConnell, S., Microsoft Press, 2004. (useful tips on good programming practice)
- CUED's C++ page
- CUED's list of Frequently Asked C++ questions
- pre-lab briefing notes
Tips
- Don't adopt a go-for-broke, all-or-nothing approach. If you're going to be ambitious, start by producing a simple version.
- Skim through the given code to see what it does. Don't try to understand each line!
- Write the header file first. Worry about inputs, outputs, call-by-reference, etc.
- Work on the analysis and trading code (work independently). Get simple versions working first.
- When each person thinks their code is working, "ship" the code and make the adjustments to produce a final version.
You can get a pass mark by
- Adding 6 lines to OurTradingMain.h
- Adding 10 lines of code to OurTradingMain.cc
- Adding 20 lines of code to do the data analysis. Adding 10 lines of code to do the graphics
- Adding 40 lines of code to the Trade function and check on success
That's about 1 line of code per person each 10 minutes.
[ back to contents]